In this rant I’ll be comparing three hot swap 5-in-3 drive cages from the big names in the server hardware world – Supermicro, Icy Dock, and Norco. Note that Norco is the American face of the company, and is rebranded as X-Case in Europe.
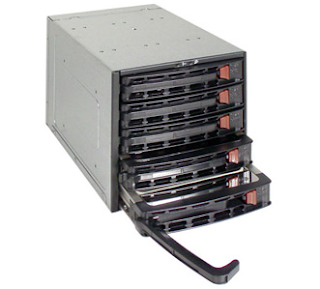
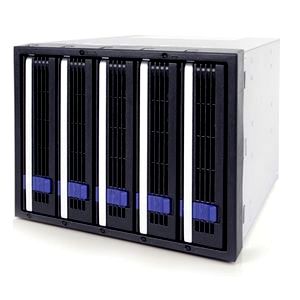
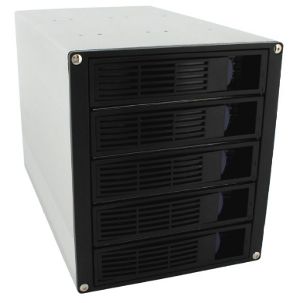
Here are the products that have come under my scrutiny:
I’ll abbreviate these as simply Supermicro, Icy Dock, and Norco.
Here are the categories under which I will rate these units:
- Price in USD (including shipping)
- Build Quality
- Airflow
- Fan Noise and Quality
- Ease of Fan Replacement
- Ease of Installation
- Drive Tray Quality
- Aesthetics
Brief Reviews
Supermicro
- Price – $113.50
- Decent build quality
- Airflow – Good
- Fan – Poor. Requires replacement (fan size: 92mm)
- Ease of Fan Replacement – Excellent
- Ease of Installation – Poor
- Drive Tray Quality – Poor
- Aesthetics – Decent
Icy Dock
- Price – $128.98
- Excellent build quality
- Airflow – Good
- Fan – Good (fan size: 80mm)
- Ease of Fan Replacement – Good
- Ease of Installation – Excellent
- Drive Tray Quality – Good
- Aesthetics – Excellent
Norco
- Price – $100.17
- Excellent build quality
- Airflow – Excellent
- Fan – Good (fan size: 80mm)
- Ease of Fan Replacement – Poor
- Ease of Installation – Good
- Drive Tray Quality – Excellent
- Aesthetics - Good
Full Reviews
Supermicro
Of these three drive cages, the Supermicro is the only truly server class drive cage. It has some advanced features, such as temperature alarms and fan fail warnings. As such, these units are intended to be installed in server class cases, not the consumer class cases that I often use in my server designs.
That said, I’m going to stop using these cages. First of all, the stock fans are insanely loud. Even if you were hiding your server away in a closet, I expect that these fans may still be audible. I replaced the stock fans with these Gelid 92mm fans for about $13 each. Add that to the cost of the cage and you are at $126.50, roughly the same price as the Icy Dock cages. Replacing the fans is very easy – the plastic fan holster simply clips onto the back of the cage, no screws to remove. The fan then has to be unscrewed from the holster to be replaced. Still, probably the simplest fan replacement process of any of the drive cages. The funny thing is, the other two cages don’t need replacement fans, so this really doesn’t count for much in the scope of this review. After replacing the fan, the airflow through this cage is perfectly adequate (green drives will stay in the low 30s). I should also note that the larger 92 mm fan will provide better cooling if hotter 7200 rpm drives are used. For green drives, the 80 mm fans used in the Icy Dock and Norco cages are fine. The Supermicro drive trays also come with ‘dummy drives’ (plastic trays that could be used to store spare screws, etc.) that will block airflow in empty drive bays.
My second gripe with the Supermico cage is the difficulty of installation into a standard consumer class case. I’ll preface by saying that most cases require you to flatten the tabs separating each 5.25″ bay before any 5-in-3 drive cage will fit. I accomplish this with a deep C clamp, like this. Now 5.25″ bays are a standard width, these cages should fit into any case easily. However, these cages must be a millimeter or so too wide, because they require he-man strength to force them into a 5.25″ bay. They will fit, but be prepared for a lot of pushing, shoving, cursing, and metal-on-metal screeching. I highly recommend that you remove your case internals before attempting this, as it isn’t difficult to slip and break something fragile.
My final quibble is with the quality of the drive cages. Drive trays are removed from the drive cages using a thin plastic handle that feels like it is going to break if I put any pressure on it. The problem is exacerbated by the fact that the drive cages slide in and out of the cage with a lot of resistance, probably because the exterior of the cage is under constant pressure due to being slightly too large for the space it is in. Another issue with the drive tray design is that if you accidentially close the tray handle before the drive is fully seated in the cage, it is somethat difficult to get it to pop open again. The release button doesn’t seem to work as consistently as I would like.
Overall Impression: Fair
Icy Dock
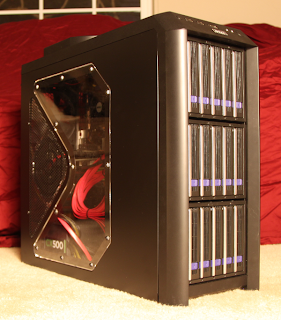
I genuinely like these cages, but they are just a bit too expensive. Let’s start off with the aesthetics – these cages look awesome. They are very attractive, and compliment a fancy case very nicely (such as the Antec 902 in the picture below). When all drive trays are full, airflow is excellent – all drives will stay in the 30s. However, the Icy Dock does lose a few points on airflow as it has no way of blocking airflow through empty drive trays!
The best aspect of the Icy Dock cage is that the stock fan is good quality and doesn’t need to be replaced (in my opinion, at least). The stock fan defintely isn’t silent, but it is within acceptable noise levels to my ears. If the server were tucked away in a closet I doubt you would hear the fans. If you wanted to replace the fan, the process is basically the same as the Supermicro cage. The only difference is that the fan plugs into the cage inside the fan cover, so it makes it slightly more difficult as you have to make sure the fan plug is lining up with the pins correctly.
The Icy Dock cage slides nice and easy into a case (with the 5.25″ tabs flattened as described above). Secure it with a few screws and you are good to go. The drive tray quality is excellent as well. The handle is metal and feels sturdy. The unlatching mechanism works reliably. My only minor gripe with the drive trays is that they simply have too many screw holes. It can be confusing where you are supposed to screw the hard drive into the drive tray, and if you choose the wrong set of screw holes the drive won’t line up in the cage correctly. There may be a bit of trial and error as you first get used to these trays. Why Icy Dock would choose to include a bunch of extra screw holes is beyond me – hard drive screw spacing has been standardized for years.
Overall Impression: Good
Norco
We have a winner! The Norco is by far my favorite from this set of drive cages.
The Good:
First of all, there is price. These cages are significantly cheaper than either of the others. The included fans are good quality, quiet enough, and don’t need to be replaced. Airflow through the cage is excellent (drives stay in the 30s), and best of all each drive tray has a metal slide that allows you to close off airflow to empty bays. Installation is easy – the cage slides in and out of the case nicely, as it should (again, 5.25″ tabs need to be flattened beforehand). The drive tray quality is excellent, better than any of the competition in my opinion. If you have used any of the Norco rackmount cases (4220, 4224, etc.) you are already familiar with these drive trays – they are identical as far as I can tell. In fact, the drive trays are interchangable with those in the Norco rackmount cases. The drive trays are sturdy and have a solid plate of metal across the bottom to protect the drive’s circuit board. They slide in and out of the drive cage nicely, and the latch is reliable. The tray handle is just plastic, not metal, but it is thick enough that it feels sturdy. Also, there are plastic tabs behind the handle that can be used to pull the tray out of the cage if it feels a bit stiff. Aesthetically I think these cages look pretty good. The four rivets on the corners detract from the clean black plastic look of the rest of the cage in my opinion, but this is quite minor. You could black them out with a marker if desired.
The Bad:
Nothing in life is perfect, and these cages are no exception. While my impression of these cages is overwhelmingly positive, there are few significant issues that I need to point out. First of all, there’s the issue of the placement of the screw holes on the exterior of the drive cage (not the drive trays, those are fine). I ordered four of these Norco drive cages within the past couple of weeks. The first I ordered for initial testing, then I ordered three more for a client build once I decided I liked the first one. While it makes no sense, here’s what I found – the screw hole locations across different cages are not the same! Two of the cages have two pairs of screw holes towards the top and middle of the cage and one pair at the bottom. The other two cages have the opposite – one pair at the top and two pairs at the middle and bottom. Now in most cases this wouldn’t matter at all since you aren’t going to use all the screw holes anyway, just two to four on each side. However, in the case I’m using for this client’s build (the Lian Li PC-P80) it meant that three of the cages had to be touching, even forcibly touching, towards the bottom of the case while the fourth sits by itself at the top with a small gap between it and the group of three (look closely at the picture below and you’ll see a slightly larger line between the top and second cage as opposed to all the others). At a glance you probably wouldn’t notice it, but it still bothered me. Why don’t all four cages have identical screw patterns? Perhaps I got two cages from an old batch and two from a new batch, or something like that. Anyway, it is definitely something worth mentioning.
The second issue I ran into with these cages is that the screws that secure the cage to the case actually penetrate into the outer-most drive chambers. So if you use screws that are too long (or if the case walls are too thin, which I believe is the case with the Lian Li I’m using), then the tips of the screws can rub up against and scratch the hard drives (possibly voiding the warranty!), or in some cases even prevent the drive from being inserted into the cage. When using these Norco cages with other cases that have thicker case walls, I haven’t had this issue. If you have this issue and can’t find shorter screws, you could also add a small washer on the outside of the case wall to force the screw to sit at the right depth.
Overall Impression: Excellent


