The search for a new budget board continues…

The JetWay JMA3-880GTV2-LF served as a budget board for all of about two weeks before being discontinued. Unfortunately this seems to be par for the course; the market for inexpensive motherboards is competitive and ever-changing. I quickly resumed my search for a new budget board right where I left off the first time. To recap, my research originally lead me to this list of options:

ASUS M4A78LT-M LE
ECS A785GM-M7
JetWay JMA3-880GTV2-LF
ASRock 880GM-LE

The first round of testing eliminated the ASRock board as I received two DOA boards in a row. The JetWay board is now discontinued so it is also off the table. In this second round of testing I therefore turned first to the ECS board as it was the less expensive of the remaining options.

I started testing the ECS A785GM-M7 with one red flag in mind – the board uses the Atheros AR8131 NIC. Atheros NICs in general are known to be hit and miss when used with unRAID, but I had no knowledge going in if this particular NIC would prove worthy or worthless.

I started running the ECS board through my normal set of tests and the preliminary results looked good. Memtest for 24+ hours passed and the board was able to boot into unRAID with the normal BIOS modifications (changing boot order, disabling all unnecessary components such as parallel and serial ports, and setting video memory allocation to the minimum amount). After these tests I would normally begin testing the motherboard’s SATA controllers, but in this case I decided to run the NIC tests first as I expected the NIC to be the motherboard’s weak point.

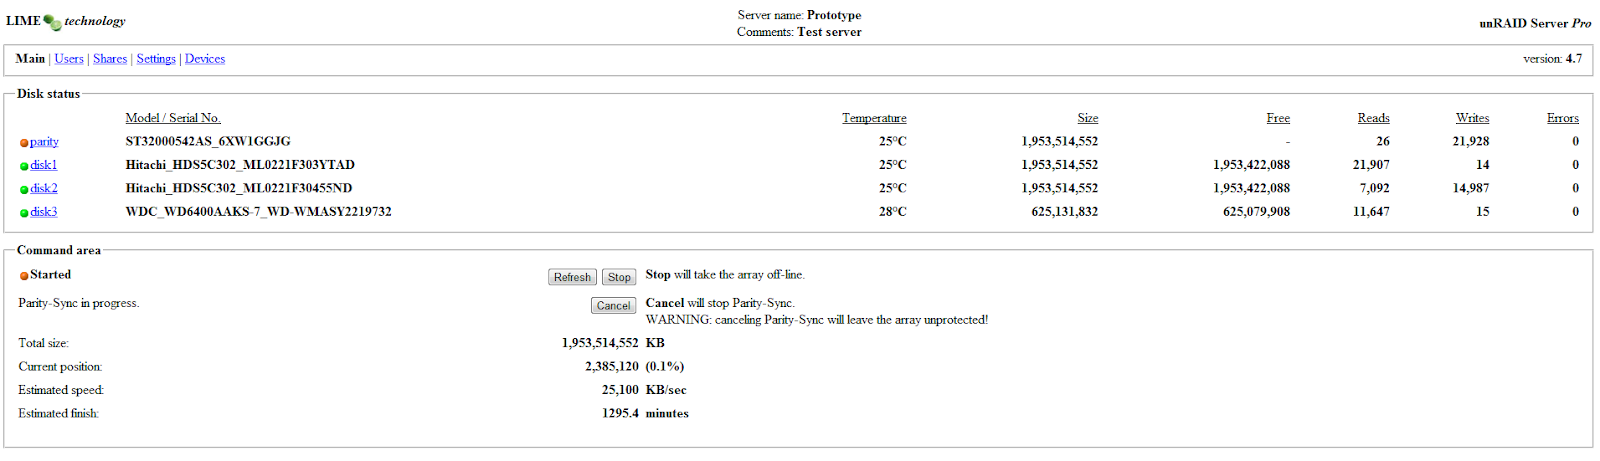
I test a board’s NIC by first building an unRAID array (running parity sync and a subsequent parity check) and then transferring at least 100 GB of data across the network both to and from the server. The client computer involved runs Windows 7, all cables involved are Cat5e or Cat6, and both my router and switch are Gigabit-LAN capable. I use TeraCopy on the Windows 7 computer with the automatic CRC checks enabled. This ensures that the data transferred from the computer to the server and back again with no data corruption or other problems.

The test results were very clear: the ECS board’s Atheros AR8131 NIC was incompatible with unRAID 4.7. The transfers would consistently fail in some way or another – sometimes the network connection would drop out, sometimes the CRC checks would find mismatches after the transfer. Both of these are common symptoms of an incompatible NIC. Interestingly enough, the exact same tests run on unRAID 5.0beta10 (the latest beta available at the time of testing) showed none of the same incompatibility. Despite repeated and redundant testing, I was not able to make the Atheros AR8131 NIC fail even once when using unRAID 5.0beta10. This indicates that there must have been some change between unRAID 4.7 and unRAID 5.0beta10 that added support for this NIC. The unRAID 5.0 beta release notes don’t indicate any specific Atheros NIC drivers added to unRAID since 4.7, but it is possible that one of the Linux Kernal updates included one.

I suggest that if you have the ECS A785GM-M7 motherboard and are having trouble with the NIC in unRAID 4.7, upgrading to unRAID 5.0beta10 (or newer) may help. Of course you will also need to take careful note of the other risks involved in running a beta version of unRAID. Regardless, even if the ECS board does work perfectly in beta versions of unRAID, I won’t endorse a board as an ‘unRAID budget board’ unless it runs in both the latest stable and the latest beta release. Hence, the ECS board is out. We are left with only one contender – the ASUS M4A78LT-M LE.

I started shopping around for the best deal on the ASUS M4A78LT-M LE when I noticed something interesting. Contrary to my original research, the LE version of the board was now more expensive than the non-LE version! ‘LE’ at the end of a motherboard’s model number generally indicates that the board is an ‘economy’ model of non-LE version. Often the LE boards will use the same chipset but a cheaper NIC or have few DIMM slots for RAM expansion. In some cases the LE board are better suited for unRAID, and in other cases the non-LE boards are a better choice even if they are slightly more expensive. It is very rare that a non-LE board would be less expensive than its LE counterpart, but at the time I was shopping for these boards that was the case! The ASUS M4A78LT-M LE was available at Newegg for $77 after shipping. The ASUS M4A78LT-M (non-LE version) was available at Newegg for $65 after shipping! A better quality board for less money? Why not! Today the LE board is still at $77 (ignoring a $10 rebate currently available) and the non-LE board is at $70.

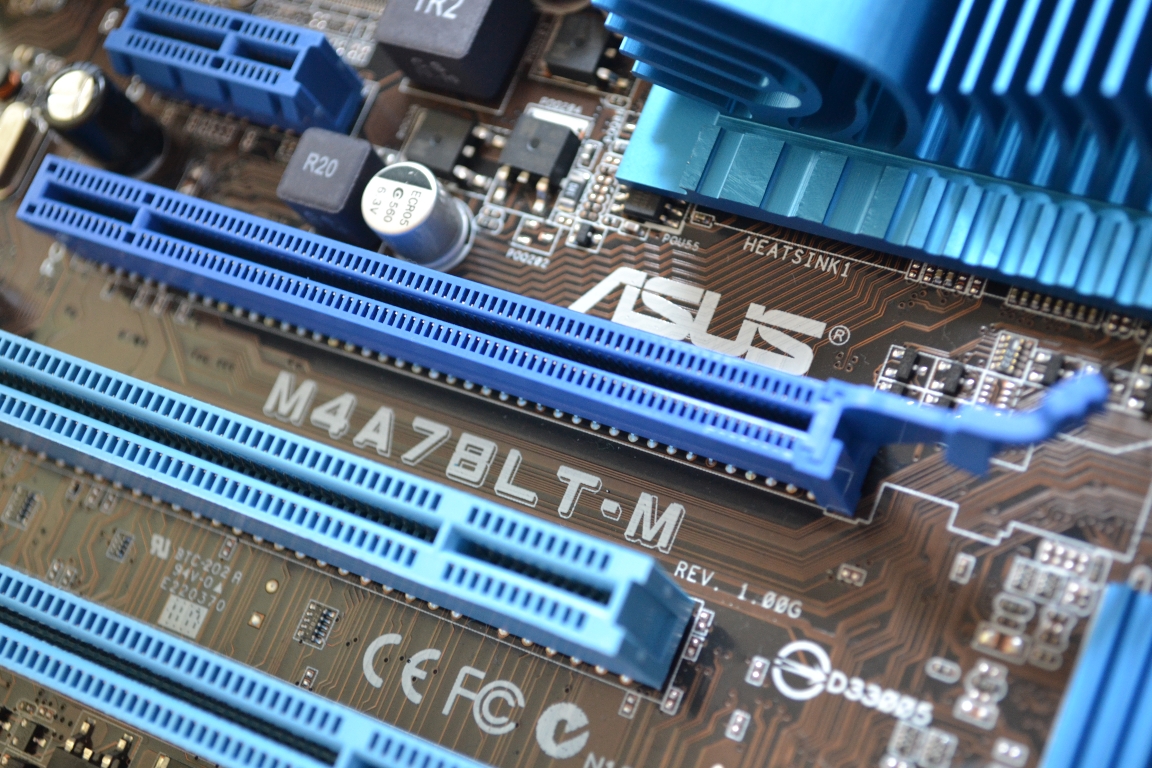
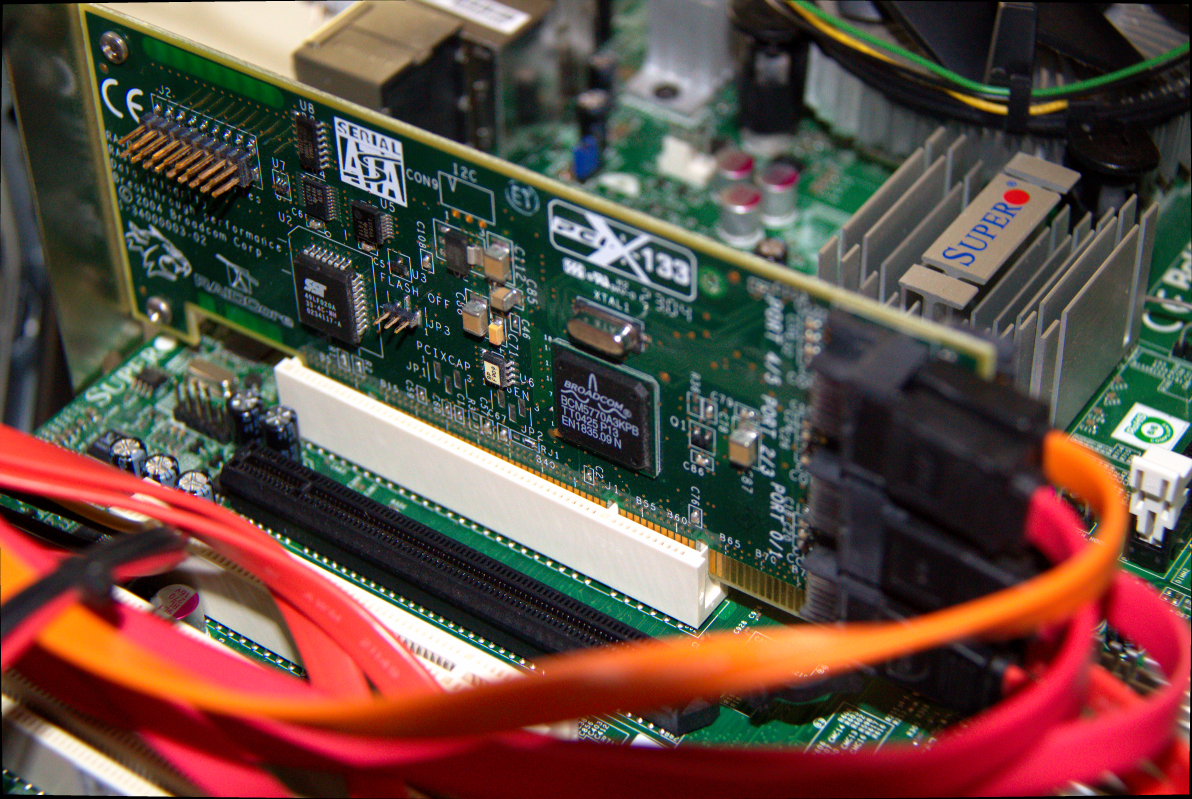
Because of this change in pricing, the focus of my testing shifted to the ASUS M4A78LT-M which wasn’t even on my original list. I paired this board with an AMD Sempron 140 processor and 2 GB of DDR3 1333 RAM by Kingston (model number KVR1333D3N9/2G). I ran it through my normal suite of tests: memtest for 24+ hours, check boot from unRAID flash drive after BIOS modification, run at least one pass of preclear on each SATA port simultaneously to check the SATA controller, build and check parity, transfer at least 100 GBs of data to and from the array over the network using TeraCopy’s CRC checks. The board also proved itself compatible with the Supermicro AOC-SASLP-MV8 and SIL3132 SATA controllers that are used in our 15 Drive Eco server designs (also known as the 15 Drive Budget Box from Greenleaf Prototype Builds). This board passed all of these tests without a single hiccup. Its these kind of positive results that make for a reliable budget board…and a boring conclusion to a blog post ;) . I’m pleased to endorse the ASUS M4A78LT-M as my latest recommendation for the unRAID budget board.

3 TB Compatibility Testing

At the time of writing, the current stable release of unRAID is unRAID 4.7. While 4.7 is a great product, one of its limitations is that it uses MBRs and not GPTs. In layman’s terms, that means that it is incompatible with any hard drive larger than 2.2 TB. As 2.5 TB and 3 TB drives are on the market today at attractive price points, many unRAID users have switched to using the latest unRAID beta (currently unRAID 5.0beta11), which has both MBR and GPT support. This means that any capacity drive can be used as a parity, data, or cache drive in the latest unRAID beta. I recently got my hands on 15 of the fabulous 3 TB Hitachi DeskStar 5K3000 CoolSpin hard drives. These are green drives that spin at 5400 RPM and use a SATA III (6.0 Gb/s) interface. I took the opportunity to test as much hardware as I had available to me for 3 TB hard drive compatibility. Here is the hardware I tested:

Supermicro X7SLA-H with a built-in Intel Atom CPU and 2 GB of DDR2 533 RAM (2 x 1GB)
ZOTAC GF6100-E-E with an AMD Sempron 140 CPU and 2 GB of DDR2 800 RAM (1 x 2GB)
Biostar A880G+ with an AMD Sempron 140 CPU and 2 GB of DDR3 1333 RAM (1 x 2GB)
Supermicro X8SIL-F-O with an Intel i3-540 CPU and 4 GB of DDR3 1333 RAM (2 x 2GB)
Asus M4A78LT-M with an AMD Sempron 140 CPU and 2 GB of DDR3 1333 RAM (1 x 2GB)

I also tested the 2 port PCIe x1 SIL3132 card that we use in certain GreenLeaf builds. I decided not to run any thorough tests on the Supermicro AOC-SASLP-MV8 controller as it has already been well established as being fully compatible with 3 TB drive through tests conducted by other members of the unRAID community.

All tests were performed using unRAID 5.0beta10 (which was the latest beta available at the time) and Joe L.’s preclear script 1.12beta (which is the only version of preclear currently available that supports 3 TB drives). A hardware component passed the test if it precleared successfully and was recognized by unRAID as an array drive. Here are the results:

Motherboard Backplane SATA Controller Result Duration (HH:MM:SS)
Supermicro X7SLA-H Norco SS-500 Onboard PASS 48:49:35
Supermicro X7SLA-H Norco SS-500 Onboard PASS 47:41:13
Supermicro X7SLA-H Norco SS-500 Onboard PASS 48:28:24
Supermicro X7SLA-H Norco SS-500 Onboard PASS 48:55:51
Supermicro X7SLA-H Norco SS-500 SIL3132 PASS 54:47:52
Supermicro X7SLA-H Norco SS-500 SIL3132 PASS 53:24:05
ZOTAC GF6100-E-E Kingwin 3-in-2 Onboard PASS 41:29:50
ZOTAC GF6100-E-E Kingwin 3-in-2 Onboard PASS 42:06:13
ZOTAC GF6100-E-E Kingwin 3-in-2 Onboard PASS 40:28:49
ZOTAC GF6100-E-E Kingwin 3-in-2 Onboard PASS 43:02:11
ZOTAC GF6100-E-E Kingwin 3-in-2 SIL3132 PASS 46:49:55
ZOTAC GF6100-E-E Kingwin 3-in-2 SIL3132 PASS 47:30:24
Biostar A880G+ Top Dock Onboard PASS 41:58:44
Biostar A880G+ None Onboard PASS 42:25:21
Biostar A880G+ None Onboard PASS 41:36:09
Biostar A880G+ None Onboard PASS 42:44:09
Supermicro X8SIL-F-O None Onboard PASS 42:12:56
Supermicro X8SIL-F-O None Onboard PASS 42:09:42
Supermicro X8SIL-F-O None Onboard PASS 41:22:09
Supermicro X8SIL-F-O None Onboard PASS 37:45:11
Supermicro X8SIL-F-O None Onboard PASS 38:29:49
Supermicro X8SIL-F-O None Onboard PASS 41:11:57
Asus M4A78LT-M None Onboard PASS 49:01:51
Asus M4A78LT-M None Onboard PASS 48:44:29
Asus M4A78LT-M None Onboard PASS 48:38:10
Asus M4A78LT-M None Onboard PASS 48:01:27
Asus M4A78LT-M None Onboard PASS 47:44:05
Asus M4A78LT-M None Onboard PASS 45:58:00

The good news is that every single piece of hardware I tested is fully compatible with the Hitachi 3 TB drives. However, as you can see from the duration results above, some of the preclear cycles were slower than others. At first I thought that certain SATA controllers were slower than others. Here’s a quick analysis of that hypothesis:

Motherboard SATA Controller Average Duration (hours)
Supermicro X7SLA-H Onboard 47.75
Supermicro X7SLA-H SIL3132 53.50
ZOTAC GF6100-E-E Onboard 41.50
ZOTAC GF6100-E-E SIL3132 46.50
Biostar A880G+ Onboard 41.50
Supermicro X8SIL-F-O Onboard 40.17
Asus M4A78LT-M Onboard 47.50

The slowest set of hardware was the Supermicro X7SLA-H and the SIL3132 controller with an average duration of 47.5 hours. This happens to the be motherboard with the slowest CPU and slowest RAM as well. The fastest set of hardware was the Supermicro X8SIL-F-O with an average duration of 40.17 hours. This also happened to be the motherboard with the fastest CPU and the most RAM. I believe these test results show that when preclearing 3 TB drives, the speed of the CPU and the RAM installed matters more than the SATA controller being used. Given this revised hypothesis, here’s the take-home analysis of this data:

CPU Amount of RAM RAM Speed Channels Average Duration (hours)
Atom 2GB DDR2 533 Dual 50.63
Sempron 140 2GB DDR2 800 Single 44
Sempron 140 2GB DDR3 1333 Single 44.5
i3-540 4GB DDR3 1333 Single 40.17

If you plan to preclear a lot of 3 TB drives, more RAM and a faster processor can help speed up the process by as much 10 hours.

The search for a new budget board

I love the diversity in the unRAID community.  Some users like to build frankenservers based on scraps and spare parts, others treat their servers like you might a fine wine; they are made of only the finest ingredients, and stored in a climate-controlled environment.  I strive to develop server designs to meet every user’s disparate needs at a price to match every pocketbook.  The keystone of any budget-minded build is an inexpensive yet capable motherboard.

During the 2+ years I’ve been an active member in the unRAID community, I’ve seen many budget boards come and go.  My favorites were the Supermicro C2SEE and the Biostar A760G M2+.  Both boards cost around $50, accepted very low power and efficient processors, and worked with inexpensive RAM.  The Biostar board was about 2 inches shorter than most microATX motherboards, which opened up lots of avenues for creative designs such as Queeg’s TinyTen, which packs 10 drives into a very compact space.

All good things must come to an end, and budget boards are no different.  We are in a new era of budget motherboards designed for HTPC applications.  The majority of today’s boards use the 880G chipset and have built-in HDMI.  Naturally little of this matters to the unRAID user, so we are constantly challenged with finding a motherboard that meets the perfect criteria for use in an unRAID server:

  • 6+ onboard SATA ports
  • Built-in Gigabit LAN
  • At least one PCIe x16 slot, ideally at least one PCIe x1 slot as well
  • Compatible with inexpensive and efficient processors and RAM
  • Fully compatible with unRAID
  • Inexpensive (ideally around $50, but at very least less than $100)
Small physical size is always a fringe benefit as well, as it allows for more compact server designs.  As we’ve had a bit of a dry spell over the past few months, I endeavored to find a new budget board suited for 15 drive or smaller builds as a labor of love for the unRAID community.  Once a suitable board is identified, I publish my findings in my Prototype Builds thread and in the unRAID wiki’s Recommended Builds section.  The purpose of this blog post is to document the process of the search, not just the results.
And away we go…
I started by zeroing in on only the motherboards that met or exceeded all of the minimum criteria.  The list was short indeed, only four boards made the cut.  They were:
I compared the various tech specs of all four boards and weighed them against their price.  The ASRock was the cheapest at $55, then the Jetway at $60, and the Asus and ECS boards were both tied at $70.  Not only was the ASRock the least expensive, but it also had the best match with the necessary criteria.  It was the clear choice, so I ordered the ASRock and put the rest on the back burner.
The ASRock board arrived promptly and just as quickly proved to be a big disappointment.  I was never truly able to test it for unRAID compatibility because I received a defective motherboard!  Twice!  Both the original ASRock board I received as well as its replacement simply would not POST.  I went through all the standard troubleshooting procedures, but the boards wouldn’t output any video or emit any beep codes even with different CPUs, RAM, PSUs, etc.  Enough hardware passes through my hands that I know I’m likely to see dead and defective components with some regularity, so I’m never put off by a DOA part.  Still, two DOA parts in a row is a bit much to stomach, so I gave up on the board after the second dud.  It is entirely possible that the ASRock board is the ideal unRAID motherboard, but unless somebody else wants to gamble on it, we may never know.
Going back to the list, the Jetway board was next in line as being less expensive than both the Asus or ECS boards. Spec-wise, the Jetway was the best choice.  The ECS board uses an Atheros NIC, which is notoriously troublesome with unRAID.  The Asus board looks good on paper, but I’ve had issues with Asus boards in the past showing odd and inconsistent incompatibilities with certain hardware, such as SATA expansion cards.
The Jetway board came with one small point of compromise – it featured only one PCIe x16 slot and no PCIe x1 slot, which sets it apart from every other board on the list.  If being used for a server that supports 14 or few drives, this would not matter one iota.  But for the popular 15 drive server design, that final drive would have to be relegated to the slower PCI bus.  I always aim to avoid using the PCI bus whenever possible, but in this case I decided to go with it.  While the PCI bus is considerably slower than the PCIe bus, a single hard drive is not capable of using up all of the bandwidth a PCI bus has to offer, so there would be absolutely no performance bottleneck.  If two or more drives were placed on the PCI bus, then I would expect some performance issues might be identified.  However, since my goal was a budget board that would support up to 15 drives, the lack of a PCIe x1 slot ends up being no big deal.
I ordered the Jetway board and got started on my suite of tests.  The purpose of these is to test the board for general reliability and hardware compatibility, as well as full compatibility with unRAID software.  My tests include:
  • Installing a CPU, RAM, and PSU and verifying that the board will POST.
  • Verifying that the board will beep when no RAM is installed.
  • Editing BIOS settings and verifying that the changes stick after a reboot.
  • Booting and rebooting from an unRAID flash drive.
  • Installing hard drives and verifying they are recognized by both BIOS and unRAID.
  • Preclearing multiple known-good drives simultaneously and checking for errors.
  • Building an unRAID array and running a parity-sync.
  • Running a parity check and checking for errors.
  • Removing a drive and allowing unRAID to rebuild it onto another drive.
  • Copying hundreds of GBs of data to and from the array over the network and verifying the data with CRC and/or MD5 checks.
  • Installing various SATA expansion cards and verifying that drives connected to them are recognized by the card’s BIOS and unRAID.
  • Running all of the above unRAID tests on drives connected to the SATA expansion cards.
The Jetway board passed all of the tests with flying colors.  I had no problems with it, not a single incompatibility or issue to report.  The board is Level 1 tested (I’ll post my results on this later this week).  I stopped here, there was no reason to test either the ECS or Asus boards as the Jetway was a better option anyway.  So I’m happy to announce that my latest recommended unRAID budget board is the JetWay JMA3-880GTV2-LF.
Ironically, the price of the Jetway motherboard has increased since I purchased it, so it is now on the edge of being too expensive.  It is currently selling for $77 after shipping, whereas I originally paid $60 for it.  Hopefully the price will come back down, or unRAID users can catch the board on sale.

Testing hardware for unRAID compatibility

Introduction
MurrayW of the unRAID forums sent me a Broadcom RAIDCore BC4000 SATA/RAID Controller card and asked me to test it for unRAID compatibility. This card has 8 SATA I ports (1.5 Gb/s) on a PCI-X interface, and according to eBay it is worth about $75. Based on these specs alone I knew it wouldn’t be terribly useful to the average unRAID user, but I agreed to test it anyway. I then decided to write up this article about the testing process as it is a good chance to explain how we at GreenLeaf Technology go about testing new hardware. This article is more about our rigorous testing procedures than it is about the hardware itself.

Without further ado, here’s the card:

The Broadcom card in action

There are only six SATA cables in that picture, you’ll have to take my word for it that the card actually has eight ports (all of which were tested). First, let’s analyze the specs – PCI-X is an older format typically only found on server motherboards. It is very difficult to find it supported on a modern server class or consumer-grade motherboard. If you can find an older motherboard that supports it, it is very fast. I am fully confident that this card paired with a PCI-X motherboard would result in a great unRAID server. However, I didn’t have a PCI-X motherboard handy. The good news is that PCI-X cards will run in standard PCI slots, albeit at significantly slower speeds. The picture above depicts the card plugged into a PCI slot – notice that a good number of the gold connectors on the card are hanging off the end of the slot, not connected to anything. This card (and most PCI-X cards) still work fine in this configuration, just with limited speed. When using a PCI-X card in a PCI slot in a long term configuration, it is a good idea to cover the exposed gold connectors with some electrical tape to prevent accidental short circuiting.

Testing
I tested the Broadcom card on four different motherboards:

Biostar A760G M2+

Biostar A880G+

Supermicro C2SEE

Supermicro X7SLA-H

The Biostar boards are both consumer-grade, whereas the Supermicros are considered to be server class. These motherboards also represent a good range of newer and older features. The Biostar A880G+ uses the modern AMD AM3 CPU socket and the brand new 880G chipset. The Supermico X7SLA-H uses a modern Intel Atom processor and the 945GC chipset. The Biostar A760G M2+ uses the older generation AMD AM2+ CPU socket, and the older 760G chipset.The Supermicro C2SEE uses the older Intel LGA 775 CPU socket and ICH10 chipset. I figured that if the Broadcom card worked on this diverse set of motherboards, then it was very likely to work on any motherboard that the average unRAID user would care to try.

As none of these motherboards have PCI-X slots, the card was used on the PCI slot of each board. Normally I would test all eight SATA ports simultaneously, but as I was short a few test drives after a recent round of hard drive failures, so I had only four drives at my disposal. I used a simple round-robin method to make sure that all eight ports on the card worked on every motherboard. I specifically tested the following:

1) Boot the server and verify that the drives are detected by unRAID

2) Run a single pass of preclear on each drive through the Broadcom card

3) Build an array and run a parity sync

4) Run a parity check and verify that there are no errors

5) Transfer data to and from drives in the array

6) Analyze the syslog to look for any oddities

7) Verify compatibility with the latest stable and beta versions of unRAID

8) Confirm that drive spin up and spin down work properly

Results Summary
1) PASS

2) PASS

3) PASS, but slow

4) PASS, but slow

5) PASS, but slow when multiple drives accessed at once

6) PASS

7) PASS

8) PASS

Detailed Results
I won’t bore you with the details of how the card ran on each motherboard, since it essentially ran the same on all four. However, there was one exception: the card did not work reliably on the Supermicro X7SLA-H. Sometimes it would work as expected, sometimes it wouldn’t work at all. However, further testing with that board revealed that the board itself was defective, so I can’t blame the Broadcom board for not working on a flaky motherboard. Unfortunately that means my array of test motherboards was reduced by one.

The card proved itself compatible with both unRAID 4.7 and 5.0beta6a, so unRAID must have the appropriate drivers built-in. For each of the three working motherboards, the Broadcom card worked perfectly. It passed all seven tests with flying colors. Well, let me temper that a bit – it passed all tests with no errors, but I was by no means impressed with the card’s performance. This is to be expected – even just four drives on a single PCI bus suffer a significant bandwidth bottleneck. I expected this card to be slow, and I was not disappointed.

Below are some screenshots of the four test drives in a parity sync (step 3 above) at various stages of completion (click each for an enlarged version). Notice that the parity sync does not pick up speed after the smaller 640 GB drive is no longer involved as the parity sync is bottlenecked by the PCI bus the entire time.

Just starting, 0.1% complete

About half way, 52.8% complete

Over three-quarters done, 78.8% complete

Almost there, 97.2% complete

According to the syslog the parity sync finished in 93449 seconds. That’s nearly 26 hours, ouch! Also recorded in the syslog is the average parity sync speed of 20904K/sec, which translates to about 26 KB/s. Keep in mind this is using only four drives, just half the card’s capacity. More drives would take even longer, while fewer would take even more time. Parity checks will take about the same amount of time as a parity sync. For comparison, the same parity sync operation using the same four drives on a modern PCIe SATA controller card such as those used in GreenLeaf servers would run over four times as fast – it would complete in under 8 hours and average about 60 KB/s.

Regarding step 5 of the testing procedures, data transfers to individual drives on the card (either through disk or user shares with no cache drive involved) were completely normal at 25 – 35 MB/s. This is expected behavior – the PCI bus bottleneck is only an issue when more than one drive is accessed. The PCI bus has enough bandwidth for a single drive to operate at full speed, so there’s no slowdown when transferring data to a single drive during normal operation. However, to demonstrate the PCI bus limitation when multiple drives are being written to, I created a special situation. I created a user share that included all three data disks and used the ‘most free’ disk allocation method. This would require that data transferred to that share was written to all three disks in a round-robin fashion, which should saturate the PCI bus and result in a much slower transfer. I transferred a large folder containing many files of varying size, from tiny documents and mp3s to large HD video files and disc images. The folder totaled 180 GBs and was comprised of 2,779 individual files spread across 193 folders. That’s a lot of files that would have to be split up across the three data drives. The transfer took place across a fully gigabit network with no other network traffic and the source drive was a 7200 rpm 500 GB Seagate data drive in a Windows 7 computer. The results were clear. The transfer took 6 hours and 26 minutes to complete and had an average transfer speed of 7.96 MB/s, one third or less the speed of a transfer to a single drive.

Conclusion
I would recommend this Broadcom card without hesitation to any unRAID user with a PCI-X motherboard as a fast and reliable way to gain an extra 8 SATA ports. For someone with a PCI port, all hopes for speed when multiple drive access is needed must be cast to the wind, but reliability is not sacrificed. If you have a desire for a slow and steady card, the Broadcom is a good choice. It has proved itself to be 100% compatible with unRAID and a slew of modern and older motherboards and chipsets. Also keep in mind that in common day-to-day use of your server only a single drive needs to be read or written to and the PCI bus will offer no limitations. Using a cache drive in the server will also help alleviate any painfully slow write performance, as the writes will be deferred until a later time.

I believe this card has its place in the unRAID community, though it may be a little too late to be helpful to most.

Stephen

5-in-3 Hot Swap Drive Cage Review

In this rant I’ll be comparing three hot swap 5-in-3 drive cages from the big names in the server hardware world – Supermicro, Icy Dock, and Norco.  Note that Norco is the American face of the company, and is rebranded as X-Case in Europe.

Here are the products that have come under my scrutiny:

I’ll abbreviate these as simply Supermicro, Icy Dock, and Norco.

Here are the categories under which I will rate these units:

  • Price in USD (including shipping)
  • Build Quality
  • Airflow
  • Fan Noise and Quality
  • Ease of Fan Replacement
  • Ease of Installation
  • Drive Tray Quality
  • Aesthetics

Brief Reviews

Supermicro

  • Price – $113.50
  • Decent build quality
  • Airflow – Good
  • Fan – Poor.  Requires replacement (fan size: 92mm)
  • Ease of Fan Replacement – Excellent
  • Ease of Installation – Poor
  • Drive Tray Quality – Poor
  • Aesthetics – Decent

Icy Dock

  • Price – $128.98
  • Excellent build quality
  • Airflow – Good
  • Fan – Good  (fan size: 80mm)
  • Ease of Fan Replacement – Good
  • Ease of Installation – Excellent
  • Drive Tray Quality – Good
  • Aesthetics – Excellent

Norco

  • Price – $100.17
  • Excellent build quality
  • Airflow – Excellent
  • Fan – Good  (fan size: 80mm)
  • Ease of Fan Replacement – Poor
  • Ease of Installation – Good
  • Drive Tray Quality – Excellent
  • Aesthetics - Good

Full Reviews

Supermicro
Of these three drive cages, the Supermicro is the only truly server class drive cage.  It has some advanced features, such as temperature alarms and fan fail warnings.  As such, these units are intended to be installed in server class cases, not the consumer class cases that I often use in my server designs.

That said, I’m going to stop using these cages.  First of all, the stock fans are insanely loud.  Even if you were hiding your server away in a closet, I expect that these fans may still be audible.  I replaced the stock fans with these Gelid 92mm fans for about $13 each.  Add that to the cost of the cage and you are at  $126.50, roughly the same price as the Icy Dock cages.  Replacing the fans is very easy – the plastic fan holster simply clips onto the back of the cage, no screws to remove.  The fan then has to be unscrewed from the holster to be replaced.  Still, probably the simplest fan replacement process of any of the drive cages.  The funny thing is, the other two cages don’t need replacement fans, so this really doesn’t count for much in the scope of this review.  After replacing the fan, the airflow through this cage is perfectly adequate (green drives will stay in the low 30s).  I should also note that the larger 92 mm fan will provide better cooling if hotter 7200 rpm drives are used.  For green drives, the 80 mm fans used in the Icy Dock and Norco cages are fine.  The Supermicro drive trays also come with ‘dummy drives’ (plastic trays that could be used to store spare screws, etc.) that will block airflow in empty drive bays.

My second gripe with the Supermico cage is the difficulty of installation into a standard consumer class case.  I’ll preface by saying that most cases require you to flatten the tabs separating each 5.25″ bay before any 5-in-3 drive cage will fit.  I accomplish this with a deep C clamp, like this.  Now 5.25″ bays are a standard width, these cages should fit into any case easily.  However, these cages must be a millimeter or so too wide, because they require he-man strength to force them into a 5.25″ bay.  They will fit, but be prepared for a lot of pushing, shoving, cursing, and metal-on-metal screeching.  I highly recommend that you remove your case internals before attempting this, as it isn’t difficult to slip and break something fragile.

My final quibble is with the quality of the drive cages.  Drive trays are removed from the drive cages using a thin plastic handle that feels like it is going to break if I put any pressure on it.  The problem is exacerbated by the fact that the drive cages slide in and out of the cage with a lot of resistance, probably because the exterior of the cage is under constant pressure due to being slightly too large for the space it is in.  Another issue with the drive tray design is that if you accidentially close the tray handle before the drive is fully seated in the cage, it is somethat difficult to get it to pop open again.  The release button doesn’t seem to work as consistently as I would like.

Overall Impression: Fair

Icy Dock
I genuinely like these cages, but they are just a bit too expensive.  Let’s start off with the aesthetics – these cages look awesome.  They are very attractive, and compliment a fancy case very nicely (such as the Antec 902 in the picture below).  When all drive trays are full, airflow is excellent – all drives will stay in the 30s.  However, the Icy Dock does lose a few points on airflow as it has no way of blocking airflow through empty drive trays!

The best aspect of the Icy Dock cage is that the stock fan is good quality and doesn’t need to be replaced (in my opinion, at least).  The stock fan defintely isn’t silent, but it is within acceptable noise levels to my ears.  If the server were tucked away in a closet I doubt you would hear the fans.  If you wanted to replace the fan, the process is basically the same as the Supermicro cage.  The only difference is that the fan plugs into the cage inside the fan cover, so it makes it slightly more difficult as you have to make sure the fan plug is lining up with the pins correctly.

The Icy Dock cage slides nice and easy into a case (with the 5.25″ tabs flattened as described above).  Secure it with a few screws and you are good to go.  The drive tray quality is excellent as well.  The handle is metal and feels sturdy.  The unlatching mechanism works reliably.  My only minor gripe with the drive trays is that they simply have too many screw holes.  It can be confusing where you are supposed to screw the hard drive into the drive tray, and if you choose the wrong set of screw holes the drive won’t line up in the cage correctly.  There may be a bit of trial and error as you first get used to these trays.  Why Icy Dock would choose to include a bunch of extra screw holes is beyond me – hard drive screw spacing has been standardized for years.

Overall Impression: Good

Norco
We have a winner!  The Norco is by far my favorite from this set of drive cages.
The Good:
First of all, there is price.  These cages are significantly cheaper than either of the others.  The included fans are good quality, quiet enough, and don’t need to be replaced.  Airflow through the cage is excellent (drives stay in the 30s), and best of all each drive tray has a metal slide that allows you to close off airflow to empty bays.  Installation is easy – the cage slides in and out of the case nicely, as it should (again, 5.25″ tabs need to be flattened beforehand).  The drive tray quality is excellent, better than any of the competition in my opinion.  If you have used any of the Norco rackmount cases (4220, 4224, etc.) you are already familiar with these drive trays – they are identical as far as I can tell.  In fact, the drive trays are interchangable with those in the Norco rackmount cases.  The drive trays are sturdy and have a solid plate of metal across the bottom to protect the drive’s circuit board.  They slide in and out of the drive cage nicely, and the latch is reliable.  The tray handle is just plastic, not metal, but it is thick enough that it feels sturdy.  Also, there are plastic tabs behind the handle that can be used to pull the tray out of the cage if it feels a bit stiff.  Aesthetically I think these cages look pretty good.  The four rivets on the corners detract from the clean black plastic look of the rest of the cage in my opinion, but this is quite minor.  You could black them out with a marker if desired.

The Bad:
Nothing in life is perfect, and these cages are no exception.  While my impression of these cages is overwhelmingly positive, there are few significant issues that I need to point out.  First of all, there’s the issue of the placement of the screw holes on the exterior of the drive cage (not the drive trays, those are fine).  I ordered four of these Norco drive cages within the past couple of weeks.  The first I ordered for initial testing, then I ordered three more for a client build once I decided I liked the first one.  While it makes no sense, here’s what I found – the screw hole locations across different cages are not the same!  Two of the cages have two pairs of screw holes towards the top and middle of the cage and one pair at the bottom.  The other two cages have the opposite – one pair at the top and two pairs at the middle and bottom.  Now in most cases this wouldn’t matter at all since you aren’t going to use all the screw holes anyway, just two to four on each side.  However, in the case I’m using for this client’s build (the Lian Li PC-P80) it meant that three of the cages had to be touching, even forcibly touching, towards the bottom of the case while the fourth sits by itself at the top with a small gap between it and the group of three (look closely at the picture below and you’ll see a slightly larger line between the top and second cage as opposed to all the others).  At a glance you probably wouldn’t notice it, but it still bothered me.  Why don’t all four cages have identical screw patterns?  Perhaps I got two cages from an old batch and two from a new batch, or something like that.  Anyway, it is definitely something worth mentioning.

The second issue I ran into with these cages is that the screws that secure the cage to the case actually penetrate into the outer-most drive chambers.  So if you use screws that are too long (or if the case walls are too thin, which I believe is the case with the Lian Li I’m using), then the tips of the screws can rub up against and scratch the hard drives (possibly voiding the warranty!), or in some cases even prevent the drive from being inserted into the cage.  When using these Norco cages with other cases that have thicker case walls, I haven’t had this issue.  If you have this issue and can’t find shorter screws, you could also add a small washer on the outside of the case wall to force the screw to sit at the right depth.
Overall Impression: Excellent