You may recall my first review comparing three of the industry-leading drive cages (read it here!) in which I deemed the Norco SS-500 my pick of the litter. Well, that version of the Norco SS-500, which I will refer to as Version 1 (V1) (although the manufacturer makes no distinction) has been replaced with what I will refer to as the Norco SS-500 Version 2 (V2). The skinny: V1 does some things better, but V2 offers some improvements as well. In short, I’m still happy with V2 and would still choose it over the other options on the market today.
First, let’s enjoy some fabulous photos taken by Sarah, my friend and neighbor at Sarabek Images.
My original review didn’t contain many photos of the Norco SS-500 V1, but luckily unRAID user Whaler_99 included plenty of shots in his comprehensive drive cage review. If you need to jog your memory, check out his photos here. Thanks Whaler_99!
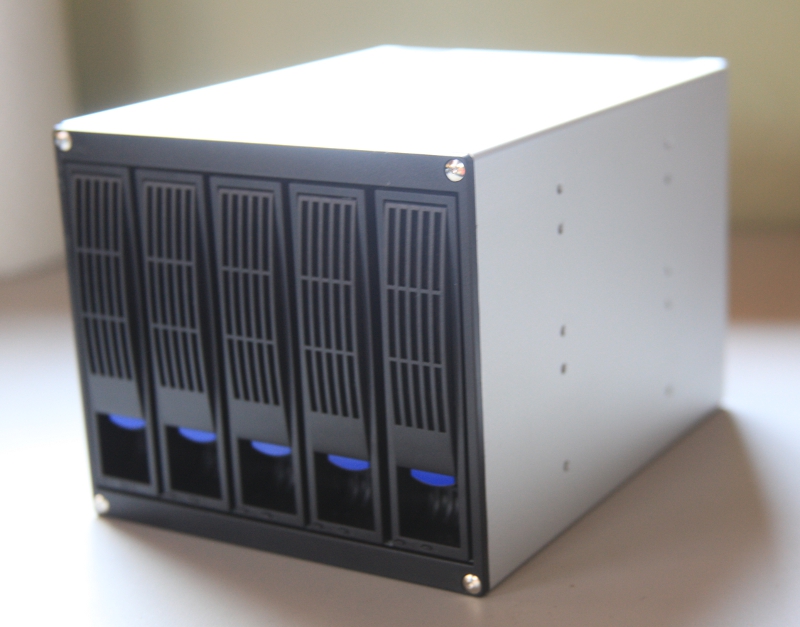
If you are familiar with the Norco SS-500 V1, you’ll notice quite a few changes to the V2 design. Most notable are:
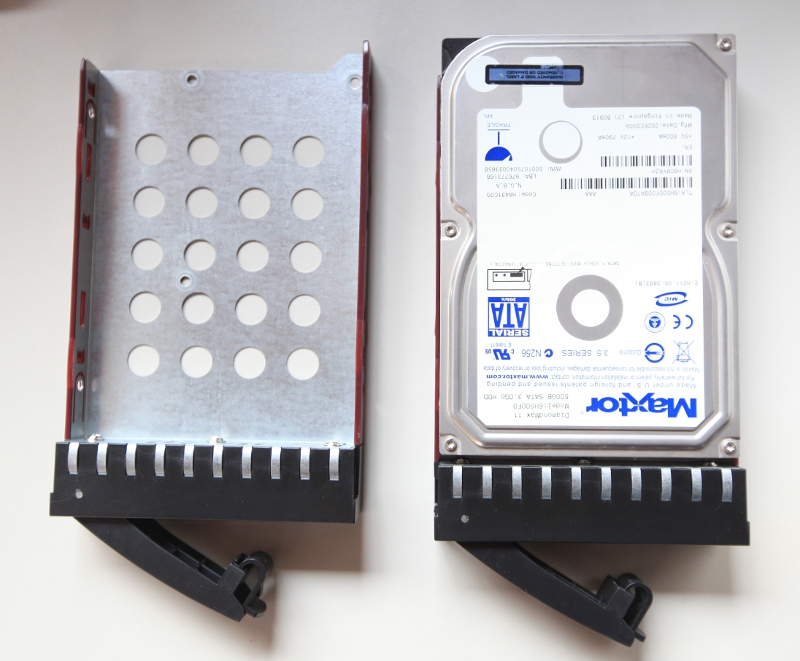
- New drive tray design. The drive trays now feature a grid of half-inch diameter holes underneath each drive to allow better airflow past the underside of the drive. As far as I can tell, the drive trays are the same dimensions as the old ones, so they should be interchangeable. However, I don’t have any V1 cages laying around, so I can’t confirm that.
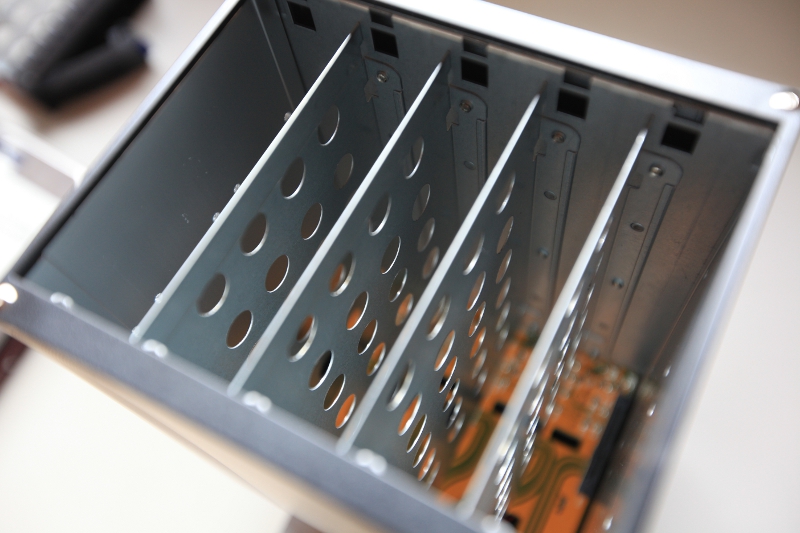
- New interior design. The metal plates separating each drive bay are now perforated with the same half-inch holes. With the exception of the column of holes closest to the front of the unit, the holes in the metal plates line up with the holes in the drive trays, allowing air to pass between the drive bays. The front-most column of holes are blocked by the solid metal and plastic part of the drive tray when it is fully inserted. Was this a design oversight?
- New plastic molding on the rear of the unit. As before, the unit features five (5) SAS/SATA ports and two 4-pin redundant Molex connectors for drive and fan power. However, the fan now sticks out past the data and power connectors, much like the design of the iStarUSA BP-350.
- New colors. The tabs on the drive tray handles are now a royal blue color (which is actually just a sticker on top of black plastic that could presumably be removed) instead of the old lavender color, and the drive tray’s sliding rails are now burgundy in color instead of the old blueish/purplish color (well, what would you call it?). The backplane is also now yellow instead of green, akin to the recent backplane change in the Norco rackmount cases.
- New LEDs. The drive tray’s activity and power LEDs are now oval-shaped. Power is blue, and drive activity is green. The colors and style match those found on the newer Norco rackmount cases.
What may not be so obvious:
- SATA III support. The yellow backplane now supports SATA III (6.0 Gb/s) drives as well as SATA II and SATA I drives. In practice this won’t make much of a difference with today’s hard drives since only SSDs are fast enough to make use of the extra bandwidth. If you are planning to install an SSD in this unit, see my notes on 2.5″ drive compatibility below.
- New SATA port layout. The new layout of the SATA data ports are compatible with locking SATA cables! Locking SATA cables can help prevent intermittent problems as the normal vibration of the cage caused by the hard drives’ rotation slowly vibrates the connection loose over time. The V2′s SATA ports are now spaced with enough width that locking SATA cables can be used on all five ports. However, there is not enough space to unlatch a cable from the middle of the group. To unplug any locking SATA cable, you may have to unplug all of them. The unit is still incompatible with right angle SATA cables, only the standard straight style will work.
- Shorter depth. The V2 is slightly shorter in depth than the V1. The V1 had dimensions of 5″ x 5.75″ x just over 8.75″ (H x W x D) (thanks again to Whaler_99 for providing these dimensions!). The V2 has dimensions of 5″ x 5.75″ x 8.5″ (H x W x D), as shown below. The V2 is about a quarter inch shorter in depth than the V1. While this doesn’t seem like much, a quarter inch can be a big help when packing a drive cage into a small case. Furthermore, the cables now connect at an even shallower depth, leaving more room for the cable’s connectors and simplifying cable management. The depth of the plane of the cable connections is just under 7.5″. Note: Newegg lists the dimensions of the unit as 8.5″ x 5.75″ x 5″ (L x W x H), but if you look at the orientation of the unit in their photos, it seems that they are transposing the width and the height compared to my measurements. My guess is that the Newegg product photographer doesn’t necessarily know how the unit would actually be installed in a drive cage, because they are showing it on its side…

What hasn’t changed:
- The drive tray’s handle is pretty much the same, besides the color modification.
- The four silver rivets on the facade of the unit. As before, I would prefer a clean black plastic facade, but ultimately this is very minor nit-pick.
- The redundant 4-pin Molex power connectors. It would have been nice to see the option to use SATA power connectors as well.
- The somewhat-loud stock fan. I was hoping for an improvement here as well, but no dice.
Other notes:
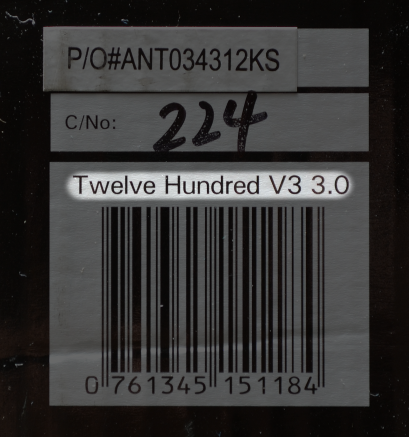
- V2 is slightly lighter in weight than the V1 due to the introduction of the plastic molding. The box claims 5.5 lbs, but I’m 99% sure they are recycling the boxes from the V1 units as the box also claims SATA I/II support, when I know the new unit actually supports SATA III as well. My Ikea scale of dubious accuracy reports roughly 5 lbs for the V2 unit (with no drives installed), which sounds about right (Newegg also lists 5 lbs). It may not be much, but when using 3 or 4 of these units in a 15 or 20 drive server, that’s a savings of 1.5 or 2 lbs, not too shabby. Those servers can get pretty heavy, so any weight saved is a good thing.
- I’ve run all of my tests by plugging in both power connectors, but only one is necessary. When building a server with a single power supply, I would connect only one and only connect the second if I had problems with the first.
- The drive trays should be compatible with 2.5″ drives (note the three screw holes in the bottom of the drive tray), but I had no luck. I wasn’t able to successfully install a 2.5″ drive into the tray because the screws included with unit are slightly too large for the 2.5″ drive’s screw holes. I don’t remember having this problem with the V1 unit, but I also didn’t have the need to install 2.5″ drives with any regularity. If you are planning to install a 2.5″ drive into these new drive trays, be prepared to source your own screws (the ones that come with the drive may work if they have flat heads that won’t stick out past the bottom of the drive tray).
Airflow & Heat Tests
In my mind, the most significant changes to the Norco SS-500 pertain to the unit’s airflow. The V1 drive trays had a fantastic feature that allowed you to close a metal shutter to cut off airflow to any empty drive bay. This forced all incoming cool air drawn in by the unit’s fan to flow through the bays actually populated with drives, and not through what otherwise would be the path of least resistance through the empty bays. In my opinion, this was the feature that really set the Norco SS-500 V1 apart from the competition, as no other 5-in-3 drive cage offered this feature (to be fair, the Supermicro units have clunky plastic dummy drives that can help block airflow, but that solution isn’t nearly as elegant).
To my dismay, the Norco SS-500 V2 drive trays do not have the option of shutting off airflow through empty bays. Quite the opposite, the introduction of the half-inch diameter holes perforating the interior of the unit allows air to flow freely between drive bays! This could have one of two effects: 1) hot and cool air can flow unimpeded between the drive bays, allowing for more uniform heat distribution across the unit (this is good), or 2) cool air can follow the path of least resistance through any empty drive bays and not effectively cool the hot drives (this is bad). I decided to run some heat tests to see if I could discern whether this new design helps or hinders the effective cooling of hot-running drives.
I choose a collection of my hottest-running test drives – three Maxtor and two Seagate 7200 RPM 500 GB drives. As these are older drives, they run hotter and more power-hungry than modern 7200 RPM and 5400-5900 RPM (Green) drives. I was used to seeing these drives run in excess of 45C in an environment without adequate cooling. I ran these hot drives through a series of passes of preclear and observed the drive temperatures as recorded in preclear’s output report. Drive bays are numbered from the left when looking at the front of the unit. Tests 1 and 2 are designed to test the unit’s ability to effectively cool drives when partially full (leaving the majority of the bays empty). Test 3 assesses the unit’s ability to effectively cool drive when completely full (no empty bays). Test 4 is a repeat of Test 3, but over a longer duration.
Test Conditions
unRAID version 5.0-beta14 or unRAID version 4.7
Preclear version 1.13
Ambient Room Temperature: 20.5 C (69 F)
Normal Preclear Cycle refers to a standard preclear cycle, which includes the pre-read, write, and post-read phases.
Fast Preclear Cycle refers to the use of the -n flag, which skips the pre-read and runs only the write and post-read phases. The write phase should produce the highest level of heat production from any hard drive, so I believe a fast preclear is an appropriate tool for a heat test.
Results
| TEST 1 |
|
|
|
|
|
| Drive Bay |
Hard Drive Model & Serial |
Preclear Cycles |
Elapsed Time (HH:MM:SS) |
Starting Temp |
Final Temp |
| 1 |
Maxtor 6H500F0 H80BYRZH |
1 Fast |
02:32:55 |
23 C |
34 C |
| 2 |
Maxtor 6H500F0 H80C0QFH |
1 Fast |
02:36:57 |
23 C |
33 C |
|
|
|
|
|
|
| TEST 2 |
|
|
|
|
|
| Drive Bay |
Hard Drive Model & Serial |
Preclear Cycles |
Elapsed Time (HH:MM:SS) |
Starting Temp |
Final Temp |
| 4 |
Maxtor 6H500F0 H80BYRZH |
1 Fast |
02:30:15 |
32 C |
35 C |
| 5 |
Maxtor 6H500F0 H80C0QFH |
1 Fast |
02:35:03 |
31 C |
33 C |
|
|
|
|
|
|
| TEST 3 |
|
|
|
|
|
| Drive Bay |
Hard Drive Model & Serial |
Preclear Cycles |
Elapsed Time (HH:MM:SS) |
Starting Temp |
Final Temp |
| 1 |
Maxtor 6H500F0 H80BYRZH |
1 Fast |
02:35:51 |
29 C |
34 C |
| 2 |
Maxtor 6H500F0 H80C0QFH |
1 Fast |
02:40:32 |
29 C |
35 C |
| 3 |
Maxtor 6A500FO 5QG04QSP |
1 Fast |
02:22:48 |
21 C |
33 C |
| 4 |
Seagate ST3500630AS 5QG0AD03 |
1 Fast |
02:27:59 |
22 C |
33 C |
| 5 |
Seagate ST3500630AS 9QG19EFN |
1 Fast |
02:13:11 |
23 C |
32 C |
|
|
|
|
|
|
| TEST 4 |
|
|
|
|
|
| Drive Bay |
Hard Drive Model & Serial |
Preclear Cycles |
Elapsed Time (HH:MM:SS) |
Starting Temp |
Final Temp |
| 1 |
Maxtor 6A500F0 5QG04QSP |
1 Normal |
09:24:00 |
38 C |
34 C |
| 2 |
Maxtor 6H500F0 H80BYRZH |
1 Normal |
10:05:58 |
40 C |
35 C |
| 3 |
Seagate ST3500630AS 9QG19EFN |
1 Normal |
09:15:21 |
39 C |
35 C |
| 4 |
Maxtor 6H500F0 H80C0QFH |
1 Normal |
10:21:59 |
38 C |
33 C |
| 5 |
Maxtor STM3320620AS 5QF3QPRY |
1 Normal |
05:53:02 |
28 C |
32 C |
Note1: Test 2 was run immediately after the end of Test 1, which accounts for the high starting temperature. Test 4 was also started with hot drives immediately following an unrelated test. All other tests were run after letting the drives sit powered off for many hours, so they started at room temperature.
Note2: The Seagate drive ending in AD03 apparently failed between Test 3 and Test 4. While I doubt this failure had anything to do with the Norco SS-500 V2, I can’t rule it out either. It was an old drive and I believe it died of natural causes. In Test 4 I replaced it with my next largest 7200 RPM drive, which is a Maxtor 320 GB ending in QPRY (hence the much shorter preclear cycle elapsed time).
Note3:I purposefully mixed up which drives went into which drive bays when transitioning between Test 3 and Test 4 as I wanted to see if the drives that ran the hottest in Test 3 would also run the hottest in Test 4. It appears that there is no correlation.
Average Change in Temperature: +3.93 C
Max Final Temperature: 35 C
Max Variance of Final Temperature: 3 C
I am very pleased with these test results. They show several positive outcomes: 1) the Norco SS-500 V2′s stock fan and new airflow design are well suited for cooling five hot-running 7200 RPM hard drives in a standard room temperature environment (Test 4 even shows the drives as cooler by the end of the test than at the beginning!), 2) the new airflow design (specifically the perforated holes in the drive trays and bay dividers) allow for even distribution of heat between all drive bays, which results in a very low temperature variance between bays. Put another way, there are no pockets of hot air collecting in any region of the drive cage, but instead all hot air is effectively vented out of the rear of the unit even when it is only partially full. After running these tests, I’m confident that the stock fan is capable of handling hot drives in any arrangement even without the option of preventing airflow through empty bays. If noise is not a concern for you, then there’s no need to replace the stock fans in these units. If noise is a concern, then that leads us to the topic of….
Fan Replacement
The stock fans in the Norco SS-500 V1 seemed to have a bit of variance in terms of noise levels – I found some to be acceptable, and some to be unacceptable. Sensitivity to fan noise is a very subjective and circumstantial matter, so even the fans that I considered to be acceptable for a home office still may be too loud for a home theater room. Also, just like any other hardware, fans can wear out and fail over time. Therefore, the ease with which one can replace the fan in a drive cage is an important consideration.
I’ll be frank – fan replacement in the Norco SS-500 V2 is not easy. In V1, a few simple screws would free the fan from its binds, and replacing the fan was just as easy. Granted, replacing the fan in a V1 that was installed in a chassis was no picnic, but replacing the fan of a unit prior to installation was no big deal. V2 has taken a significant step backwards. It is not only more difficult to replace the fan of a unit installed in a chassis, but it is also quite the pain to replace a fan prior to installation as well! The black plastic molding on the rear of the unit comes off with the removal of four screws, like so:
Unplug the fan’s 4-pin power connector and the two parts will separate. The fan is likewise connected with four small and non-standard screws (definitely not the typical self-threading fan screws that I’m used to). Removing the screws is not enough to free the fan, it is held in place by friction from four thin plastic posts, as seen below:

These posts are the fatal flaw of the fan housing. The fan sits in the housing at such a depth that it is impossible to simply lift the fan off the posts. The only way that I’ve figured out to remove the fan is to flip the fan housing over and very gingerly press it downwards on the center of the fan with a small screwdriver. I had to press in a star pattern (much like tightening the lug-nuts on a car tire) in order to force the fan off the posts without breaking one, as each press with the screwdriver would bend all the posts ever-so-slightly. I should say, that’s the technique I figured out the second time I attempted to remove a fan from one of these units. The first time I broke it:
 |
| Oops |
I pulled the fan from the interior side (the side without the sticker) and snapped off the lower two plastic posts. So, my warning to you: if you plan to replace the fan in the Norco SS-500 V2, BE CAREFUL not to break the four posts that secure the fan in place. If you were to break them, like I did, a bit of double-sided tape might be a quick and easy solution to allow you to mount your replacement fan without screws. Or you can take my route, which was to email Norcotek support, explain the situation, and ask for a replacement fan guard. To their credit, Norcotek shipped me a replacement fan housing the following day, which is the best customer service I’ve seen from that company to date. Granted, I mentioned that I broke the fan housing in the process of evaluating the unit for a review for this blog, so perhaps that helped speed along their response. 
For anyone curious, this is the Norco SS-500 V2′s stock fan:


The sticker reads: KENON Motors, DC Brushless, Model KMF08DHHD1B. The Kenon Motors website is down, so I haven’t been able to find any further information about this fan, such as the dB and CFM ratings (if you are able to track them down, please leave them in a comment below!). The stock fan is a 4-pin model, however the backplane provides only 3 pins to power the fan. The good news regarding fan replacement is that any standard 3-pin or 4-pin 80 mm fan will work. By ‘standard,’ I am referring to the symmetrical frame that allows you to mount a fan either direction, as shown in the photo above. For an example of a non-standard frame, see the Arctic Cooling ACF8 Pro. Note how the Arctic Cooling fan has screw holes on only one side? This (and most other non-standard fans) are NOT compatible with the Norco SS-500 V2′s mounting system. While I don’t have any on hand to physically test them, I would tentatively recommend the Coolink SWiF2-801 as an appropriate replacement fan for the Norco SS-500 V2. My reasons are twofold: I know this particular fan to be quiet and yet powerful enough to cool five hot drives (it is the same model I used to use in the Norco SS-500 V1), and it does use the standard symmetrical fan frame design. As soon as I do have a chance to actually test this fan in the V2, I will amend this post with my results.
Another point of interest regarding the fan: according to the box and the Manufacturer’s Website the Norco SS-500 V2 has two jumper options for altering the function of the fan. One is supposed to force the fan to run at half-speed, the other is supposed to disable the fan fail alarm (indicating that the alarm should be enabled by default). The V2′s backplane actually has five individual jumpers, none of which seem to do anything. I’ve powered on the unit with no fan attached and no alarm sounds. In fact, I can’t find a speaker on either side of the backplane. At this point, I don’t believe the V2 has any fan fail alarm or fan speed control. Installing your own fan speed controller would also be tricky – you would probably have to cut your own cable-routing hole through the plastic molding.
Final Thoughts
At the end of the day, I do miss the V1′s feature of being able to shut off airflow to individual drive bays. However, my heat tests show even without this feature, the V2 is capable of properly venting hot air even in a partially-full configuration. Therefore, the airflow shutters aren’t necessary. In fact, since I’ve read reports of users forgetting to open the shutters when installing new drives, perhaps it is a good thing that this is no longer a variable. My other primary gripe is the difficulty of replacing the fan. If you are looking for a drive cage that will let you replace the fan without dismantling your server, then the SUPERMICRO CSE-M35T-1B that I reviewed earlier is the only option, but it has other drawbacks as well. I still consider the Norco SS-500 V2′s drive tray design to the best of the bunch, and considering that the average user will spend most of their time dealing with the drive tray and not with the rest of the unit, I believe that this benefit outweighs the few other downsides of the unit. I will recommend the Norco SS-500 V2 in the Greenleaf Prototype Builds and they will be the standard drive cage used in the Greenleaf Cleverbox 15 and Cleverbox 20 Tower Servers.
I believe I’ve covered all the bases, but if you feel I’ve overlooked something or if there are any further tests you would like me to run, don’t hesitate to leave a comment below! Thanks for reading!


