Thanks Defcon!

Defcon XX was a blast, it was great to meet so many fellow geeks and hackers! I snapped a few cell phone pics of my live unRAID demo:

Alas, nobody took me up on my challenge to fill the 30 TB server by the end of the con, but someone did hack my WIFI router on several occasions, so that’s fun!

Defcon highlights for me were Michael Perklin‘s talk and Q&A session on Anti-Forensics and Anti-Anti-Forensics, the GTV Hacker talk on rooting the GoogleTV, the short-lived but delicious WhiskeyCon, and dancing my ass off to Infected Mushroom poolside at the Rio. Maybe now that the con is over I’ll finally have time to hack my badge!

Check out the rest of the badges here. At the Unix Surplus booth I was awash in a sea of servers….

We’re working together to bring you a powerful new unRAID system at a bargain basement price. Here’s a sneak peek: 1U Server (Dual Core Intel CPU & 4 GB of RAM) + 3U 16 Bay Expansion for $1000 fully configured! Like us on Facebook and follow us on Twitter to be the first to hear about it!

See y’all next year!

Antec Twelve Hundred V3 3.0

While building a Cleverbox 20 for a customer, I was surprised to find that Antec has made some slight changes to their Antec Twelve Hundred V3 chassis design. Note that neither the Antec website nor Newegg, the vendor who sold me the item, make any mention of these changes in the tech specs, photos, or in the product description. However, according to the box, the case is now known as the Antec Twelve Hundred V3 3.0:

A subtle change in name
At least the photo on the box is correct…

The primary change is the addition of two new front panel USB 3.0 ports, for a total of three. Secondly, they now connect directly to the motherboard with the new standard 20 pin USB 3.0 header cables:

This is a big improvement over the Antec Twelve Hundred V3, which required you to plug a long USB 3.0 cable into a rear panel port on your motherboard, which was far from elegant. My only gripe with this change is that Antec did not provide any USB 3.0 to USB 2.0 header adapters with the case. This means that if your motherboard doesn’t have any USB 3.0 headers, then you’ll need to provide your own adapters such as these from Lian Li and Corsair. A recent Lian Li case that I wrote about in a previous blog entry did come with one of these adapters. I think it would be a good practice on the part of all chassis manufacturers to follow suit. (Edit: actually, Antec may be on top of this, see below.)

The other major change is the new style of thumb screws provided:

These new thumb screws are a welcome improvement. I find them more aesthetically pleasing as they match the matte black finish on the rest of the case interior, and they are just as easy to work with. Happily, the new thumb screws can be used to secure four Norco SS-500 drive cages!

Well, sort of. They mostly fit, but you’ll find that a few of them are a bit loose or won’t tighten completely. I’m not sure if the screws or the screw holes on the drive cages are to blame. Either way, as long as you aren’t moving your server around too much then these screws should be fine to use. Antec doesn’t provide you with enough of the thumb screws to secure each cage with four on each side, but you can use just two per cage on the backside or three per cage on each side and be just fine. However, if you plan to ship your server as I will be doing with this one, then I recommend using the (expensive!) Norco screws for a tighter fit. And yes, you do still have to flatten the tabs separating the 5.25″ bays.

Protip: when installing Norco SS-500 drive cages into this case, make sure that the drive trays face down as in the photo above. This is the only way the screw holes will line up correctly. Also, adjust the depth of each cage such that the vertical pattern of two screw holes lines up, not the pattern of three.

I haven’t noticed anything else about the case that has changed. The Antec Twelve Hundred V3 3.0 is still the most economical and flexible solution for a 20 Drive tower case readily available in the US.

Edit: Just after publishing this blog post I received this email from Antec!

Trouble Ticket ID: 251059
Description: Missing USB 3.0 to USB 2.0 header adapters
Comment By: James Sean
——————————————————-
Comment: Hello Stephen,

Thank you for contacting Antec. We do have the USB3 to USB2 adapters for your case. I will contact our Parts Division on getting you these adapters out to you. You should be receiving them 7-10 business days from now.

James
Antec Support

Top 3: Free Software That Every Small Business Should Be Using

#1

Evernote is slowly but surely changing my life. This free, ad-supported software installs on every computer and device you own, and is accessible through any web browser. In the vein of Microsoft OneNote and countless sticky note programs for your phone and computer, Evernote allows you to create and edit notes wherever you are. Notes can contain text, photos (via cameraphone and webcam), audio recordings, digital ink (if you have a stylus), web clippings, or all of the above. Each note will sync with every computer and device your use, so you are always current. What’s more, you can search recognizable text in photos, including handwriting. Take photos of whiteboards, scratch paper, receipts, parking vouchers, and actual sticky notes and you’ll be able to organize and search for them with ease. Use this feature to help you input receipts and purchase orders that aren’t already digital, or turn your back-of-the-napkin contract into a permanent record. Evernote also lets you share individual notes and entire notebooks with others in read-only mode, but to allow modification and a truly collaborative notebook, you have to buy their Premium service. Check out Evernote’s short video and see for yourself.

My Evernote work notebook contains photos from my phone, screenshots, web clippings, audio recordings, and of course tons of text.
A search for the word ‘green’ returns text recognized within images! Photos taken with my phone are also tagged with location and GPS coordinates.

#2

Trello makes project management easy. It runs from a web browser or app on your mobile device, there is no off-line mode. Trello sports an engaging flashcard-esque look and feel. If you are visual-spatial in your thought patterns and organizational style, you will love it. I like Trello for more dynamic projects and tasking, such as software development and brainstorming ideas. Check out their video for an in-depth look.

An example of Trello’s flashcard-style interface

#3

If your business deals with any sort of shipping and receiving, then you want Slice! Slice digs through your email account and finds anything that looks like shipping and tracking information, then puts it all in one place. The mobile app gives you quick access to all of that information, plus it alerts you as your package moves through various stages of shipping (item shipped, item out for delivery, item delivered, etc.). Here’s their video.

My Slice Home screen, showing my most recent orders and deliveries.
My Slice Track Packages screen, showing recent incoming and outgoing shipments.

Dropbox + uTorrent FTW!

This solution just occurred to me and upon trying it out it I can only say: GREAT SUCCESS.

Here’s my network at a glance:

The HTPC has a standard 5 MBit internet connection, whereas the office computer has a blazing fast 20 Mbit internet connection. I download most things through the slower HTPC connection simply because I don’t want to have to ferry the downloaded data from my office to my home via a flash drive or external hard drive.The HTPC boots from a small SSD and downloads to the home server’s cache drive. If I want to download something massive or don’t want to be patient, then I’ll use my office computer’s 20 Mbit connection. The office computer downloads to an internal 500 GB data drive, but seeds from the office server. I have TeamViewer installed on all the Windows machines so that I can control any computer/server on the network from any other computer.

I do most of my torrent browsing from my laptop or from my office computer, and I wanted to be able to trigger a download on either the HTPC or Office computer from anywhere. Then it hit me: point uTorrent’s Autoload directory to a folder within Dropbox!

Win7 is my username on this computer, yours will be different.

It was one of those “Its so simple, why didn’t I think of this before?” kind of moments. I now have two Dropbox autoload folders:

No matter what computer I’m using to browse, I can trigger a torrent download on either the HTPC or office computer simply by placing the torrent file in the appropriate Dropbox autoload folder. I also have uTorrent set to ‘delete loaded torrents,’ so Dropbox automatically informs me if the process is successful by notifying me when the torrent file has been deleted (meaning that uTorrent did in fact pick it up and start downloading it). I can still use TeamViewer or uTorrent remote to check on the download status if needed.

My network now looks like this:

If you have only one computer that you would like to handle all of your torrent downloading you could remap your browser’s default download location to be within Dropbox as well! This would remove one step from the process, but it would also clutter up your Dropbox with all kinds of non-torrent files that you have downloaded.  If you like to keep a clean download folder (or use Dropbox’s selective sync function) then this option might work well for you.

Ideally, I would like to run both uTorrent and Dropbox directly on my unRAID servers so that the Windows computers don’t have to run 24/7. Since uTorrent and Dropbox both offer Linux versions, it might be possible to create unRAID add-ons for them in the future. I’ll add this idea to Greenleaf’s ever-growing to-do list. In the meantime, an ESXi server would allow you to run unRAID and Windows side-by-side, getting the best of both worlds.

Overall this is a fairly simple solution, it just took me a while to come up with this specific combination of cloud syncing and watch folder technologies to get this system just right. My next task: figure out how to auto-rename all downloaded torrents for easy scraping within XBMC without having to manually point each torrent to the renamed file….

- Stephen

First impressions of a new portable case from Lian Li

Hooray, a new toy! I’ve had my eye on the Lian Li PC-TU200 for some time now, and have been waiting for it to come down in price. It finally has, at least temporarily. Newegg currently has it on sale for $136 shipped (ends 5/23/2012), see here for details. Hopefully the non-sale price of this unit drops as well.

This isn’t meant to be a complete review, just my initial impressions of the chassis. Behold, some glorious cell phone photos:

Front – the handle is folded down and not visible
Back – again the handle is folded down. The white box containing the chassis accessories is zip-tied in place for shipping.
One of the most unique side panel removal systems I’ve seen – first release a single thumbscrew (top)…
…then press the lever and the side panel pops open!
Each side panel is held in place by 8 of these small metal things (well, what would you call them?)
A glimpse of the interior
The drive cage and backplanes. Looks like there’s plenty of airflow vents.

The rear of the backplane – 4 SATA ports and 2 Molex. 120mm intake fan to the left, secured by a single thumbscrew.

Hard drives are secured with plastic rails attached with four large thumbscrews. Not trayless, but at least tool-less!
The hard drive installed in the cage. The single thumbscrew on the left secures the sliding metal rail that holds all four drives in place.
The drive cage also features two mount point for 2.5″ drives in the middle and at the bottom. I’m not sure at this point if the drive will line up with the backplane SATA and power ports, or if it prevents a 3.5″ drive from being installed immediately above it (this photo indicates both limitations are likely true).
Another view of the 120mm intake fan.
The 120mm intake fan. A 3-pin model with a 2-pin Molex adapter and removable dust filter. Fan removal is fairly easy. It is held in place primarily by friction from the rubber anti-vibration mounts, and is locked with a single thumbscrew. Depending on the noise levels, I may replace this fan with a 4-pin PWM model.
The bottom of the chassis. On the left, a second removable dust filter, this one accessible from the exterior. On the right, a third 2.5″ drive mount point. This mount point would only interfere with large or long PCIe video cards, which I won’t be using. The feet are made of metal.
The chassis ships with a handy USB 3.0 to USB 2.0 pin adapter, which I will be using since my motherboard doesn’t support USB 3.0. I’m glad those two front USB ports won’t go unused!
Finally, the chassis ships with a well-designed and easy to follow set of graphical instructions. Always a nice touch.
I was somewhat surprised to find that the exterior corner pieces and handle are made of plastic, while the majority of the rest of the construction is brushed aluminum and steel. The plastic is thick and feels durable, so I’m not worried.
My only real concern is that in unpacking the chassis I discovered two of the plastic clips that secure the side panels in place free-floating in the package, one of which was broken. Given Lian Li’s track record for customer service, I expect that a quick email and photo will be met with a replacement clip sent my way. However, I do wonder how these plastic clips will hold up over time. Since most of the construction is durable aluminum and steel, I wish these clips were made of metal as well.
I won’t have a chance to finish this build for another week or more. I’ll post more photos and comments as the build progresses.

- Stephen

4 TB Hard Drive Compatibility Testing

Another round of hardware compatibility testing is complete, and we are excited to share the results with you! This time around we took a critical look at one of the 4 TB hard drives that has recently hit the market: the Hitachi H3IK40003254SW 4TB 5400 RPM 32MB Cache SATA 6.0Gb/s 3.5″ Internal Hard Drive (I promise that’s the drive’s model number, not its serial number!). One of our Australian customers was generous enough to purchase one of these drives along with his Cleverbox Rackmount 20 and allow us to test the drive on all the hardware we have available. Thank you Trevor, this review wouldn’t have been possible without your generosity and patience!

The Hitachi H3IK40003254SW 4TB hard drive (with blank label). Looks pretty familiar, eh?

Now down to brass tacks…or aluminum/glass/ceramic substrate platters? Can that be a new expression? Anyway, the Hitachi 4TB drive we tested is a ‘green’ drive, meaning that it spins at a slower rotational speed than a ‘black’ drive, thereby saving power at the slight sacrifice of read/write performance. While benchmarking the drive’s performance was not the focus of our testing, you will see some performance measures in the results below, as we wanted to ensure that unRAID’s standard performance was not reduced by the drive’s slower spindle speed (it wasn’t). When choosing a server, it is important to consider the type of hard drive(s) you would like to use with the server, as a server that supports a full array of ‘black’ drives requires a higher-rated power supply that can handle the extra energy consumed by these drives. This particular Hitachi 4TB drive will work on any Greenleaf server build, with or without the ‘Black Drive Upgrade’.

Hardware

We tested the following hardware:

Motherboard CPU RAM
Zotac GF6100-E-E AMD Sempron 145 1 GB
Foxconn A88GMV AMD Sempron 145 4 GB
MSI 760GM-P33 AMD Sempron 145 4 GB
ECS A785GM-M7 AMD Sempron 145 8 GB
Supermicro X9SCM-F Intel Pentium G620 8 GB
Biostar A760GM2+ AMD Sempron 145 2 GB
Supermicro X8SIL-F-O Intel Core i3-540 8 GB
HP ProLiant N40L AMD Turion II Neo 2 GB
SATA Controllers

Monoprice 2 port PCIe x1 SIL3132 SATA controller card (SIL3132)
Supermicro AOC-SASLP-MV8 PCIe x4 SATA controller card (SASLP)

Software

All tests were run with unRAID version 5.0-beta-14 and preclear version 1.13.

Preclear Tests

In these tests, we ran the 4 TB Hitachi drive through full and partial preclear cycles on one of our tried-and-true test servers. The purpose of these tests were to evaluate the health of the drive.

Test 1
Hardware: Zotac GF6100-E-E, AMD Sempron 145, 1 GB RAM
Preclear Type: Normal (full cycle)
Notes: 5 small test drives precleared alongside 4TB drive
Result: PASS

Successful preclear of 4 TB Hitachi hard drive

Test 2
Hardware: Zotac GF6100-E-E, AMD Sempron 145, 1 GB RAM, SIL3132
Preclear Type: Fast (-n flag applied, pre-read skipped )
Notes: No other drives present
Result: PASS

Parity Build & Sync Test

In this test, we assigned the 4 TB Hitachi drive as an unRAID parity drive and five other smaller capacity test drives as unRAID data drives. We then ran a parity sync, followed by a parity check (unRAID’s default ‘check and correct option’). Since we only had one 4 TB drive, we were unable to run a parity sync or parity check with the 4 TB drive in the data slot (since the parity drive must be the largest capacity drive installed in the array).

Test 3
Hardware: Zotac GF6100-E-E, AMD Sempron 145, 1 GB RAM
Parity Sync: Complete
Parity Check: Complete, no errors
Notes: 4TB drive assigned as parity drive, 5 small test drives assigned as data drives
Result: PASS

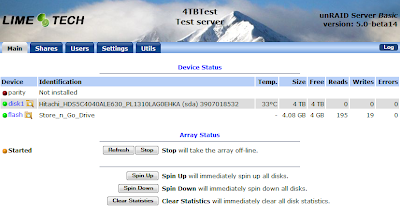
unRAID Device Recognition and Data Transfer Tests

In these tests, we booted each server with the 4 TB Hitachi drive connected first to the motherboard’s SATA ports, then to a SIL3132 card’s SATA ports, and finally to a SASLP card’s SATA ports (via a forward breakout cable). In each case, we assigned the 4 TB drive as unRAID data disk1 with no parity drive (or any other drive) assigned, as in the screenshot below. We then transferred a small amount of test data (10 – 100 GB) from another unRAID server and/or from a desktop computer running Windows 7 to the 4 TB drive while using TeraCopy’s CRC check to verify the data integrity after the transfer. The test was considered successful if the CRC check returned no errors.

4 TB Hitachi hard drive assigned as data disk1

Test 4
Hardware: Foxconn A88GMV, AMD Sempron 145, 4 GB RAM
Motherboard SATA Ports: PASS
SIL3132: PASS
SASLP: PASS
Result: PASS

Test 5
Hardware: MSI 760GM-P33, AMD Sempron 145, 4 GB RAM
Motherboard SATA Ports: PASS
SIL3132: PASS
SASLP: PASS
Result: PASS

Test 6
Hardware: ECS A785GM-M7, AMD Sempron 145, 8 GB RAM
Motherboard SATA Ports: PASS
SIL3132: PASS
SASLP: PASS
Result: PASS

Test 7
Hardware: Supermicro X9SCM-F, Intel Pentium G620, 8 GB RAM
Motherboard SATA Ports: PASS
SIL3132: PASS*
SASLP: PASS
Result: PASS
Note: *Specific BIOS configuration required, see below

Test 8
Hardware: Biostar A760GM2+, AMD Sempron 145, 2 GB RAM
Motherboard SATA Ports: PASS
SIL3132: PASS
SASLP: PASS
Result: PASS

Test 9
Hardware: Supermicro X8SIL-F-O, Intel Core i3-540, 8 GB RAM
Motherboard SATA Ports: PASS
SIL3132: PASS
SASLP: PASS
Result: PASS

Test 10
Hardware: HP ProLiant N40L, AMD Turion II Neo, 2 GB RAM
Motherboard SATA Ports: PASS
SIL3132: N/A
SASLP: N/A
Result: PASS

All tests passed with nothing out of the ordinary to note, with one exception: in Test 7, the SIL3132 test initially failed. A close analysis of the syslog indicated some errors related to the SIL3132 card, which lead us to try different BIOS configurations to allow the card to function normally. We finally found a configuration that works. If you wish to use a SIL3132 card with the Supermicro X9SCM-F motherboard, make these changes in BIOS:

  1. Choose ‘Optimized Defaults’ to reset your BIOS to default settings.
  2. Chipset Configuration
    - South Bridge Configuration
    - Integrated IO Configuration
    - PCI Express Port: Enabled
    - Detect Non-Compliance Device: Enabled
  3. The SIL3132 card should now function normally with no errors reported in the unRAID syslog.

Performance

RAW Performance

A few unRAID forum members requested that we run some raw performance tests on the 4 TB drive.  The first test is a short and sweet hdparm -t test, which looks at how much data the drive can spit out during a read request three seconds in duration:

root@Tower:~# hdparm -t –direct /dev/sdc
/dev/sdc:
Timing O_DIRECT disk reads:  392 MB in  3.01 seconds = 130.27 MB/sec

The second test is the lengthier ‘writeread10GB’ test, which simulates 10 GBs of data being written to and subsequently read from the drive. The output of this test represents the maximum possible read and write speed you can expect to see from this drive, negating other factors such as RAM, network speed, and SATA controller bottlenecks. In each test you will see the write speed decrease as the data is written first to the fastest outer tracks, then later to the slower inner tracks. This is normal and expected behavior due to a hard drive platter’s areal density. The test was run three times, which extends from the outer edge of the platter to 30 GB inwards from the outer edge. Granted, 30 GB isn’t much when we are considering a 4 TB drive, and we would expect the drive’s performance to continue to decrease as the drive is filled with data.

4 TB Hitachi Performance Test 1 – writeread10GB

root@Tower:/tmp# writeread10gb /mnt/disk1/test.dd
writing 10240000000 bytes to: /mnt/disk1/test.dd
681125+0 records in
681125+0 records out
697472000 bytes (697 MB) copied, 5.02959 s, 139 MB/s
1132617+0 records in
1132617+0 records out
1159799808 bytes (1.2 GB) copied, 10.0495 s, 115 MB/s
1599090+0 records in
1599090+0 records out
1637468160 bytes (1.6 GB) copied, 15.0595 s, 109 MB/s
2075061+0 records in
2075061+0 records out
2124862464 bytes (2.1 GB) copied, 20.0756 s, 106 MB/s
2587304+0 records in
2587303+0 records out
2649398272 bytes (2.6 GB) copied, 25.0954 s, 106 MB/s
3210669+0 records in
3210669+0 records out
3287725056 bytes (3.3 GB) copied, 30.1192 s, 109 MB/s
3672917+0 records in
3672917+0 records out
3761067008 bytes (3.8 GB) copied, 35.1391 s, 107 MB/s
4114909+0 records in
4114909+0 records out
4213666816 bytes (4.2 GB) copied, 40.159 s, 105 MB/s
4610309+0 records in
4610309+0 records out
4720956416 bytes (4.7 GB) copied, 45.179 s, 104 MB/s
5120509+0 records in
5120509+0 records out
5243401216 bytes (5.2 GB) copied, 50.2389 s, 104 MB/s
5699247+0 records in
5699246+0 records out
5836027904 bytes (5.8 GB) copied, 55.2155 s, 106 MB/s
6180293+0 records in
6180293+0 records out
6328620032 bytes (6.3 GB) copied, 60.2386 s, 105 MB/s
6677349+0 records in
6677349+0 records out
6837605376 bytes (6.8 GB) copied, 65.2586 s, 105 MB/s
7173277+0 records in
7173277+0 records out
7345435648 bytes (7.3 GB) copied, 70.2785 s, 105 MB/s
7702600+0 records in
7702600+0 records out
7887462400 bytes (7.9 GB) copied, 75.2949 s, 105 MB/s
8138436+0 records in
8138436+0 records out
8333758464 bytes (8.3 GB) copied, 80.3384 s, 104 MB/s
8626362+0 records in
8626362+0 records out
8833394688 bytes (8.8 GB) copied, 85.3357 s, 104 MB/s
9135465+0 records in
9135465+0 records out
9354716160 bytes (9.4 GB) copied, 90.3545 s, 104 MB/s
9643806+0 records in
9643806+0 records out
9875257344 bytes (9.9 GB) copied, 95.3981 s, 104 MB/s
10000000+0 records in
10000000+0 records out
10240000000 bytes (10 GB) copied, 98.8984 s, 104 MB/s
write complete, syncing
reading from: /mnt/disk1/test.dd
10000000+0 records in
10000000+0 records out
10240000000 bytes (10 GB) copied, 74.7331 s, 137 MB/s
removing: /mnt/disk1/test.dd
removed `/mnt/disk1/test.dd’

4 TB Hitachi Performance Test 2 – writeread10GB

root@Tower:/tmp# writeread10gb /mnt/disk1/test2.dd
writing 10240000000 bytes to: /mnt/disk1/test2.dd
611025+0 records in
611025+0 records out
625689600 bytes (626 MB) copied, 5.03768 s, 124 MB/s
1097393+0 records in
1097393+0 records out
1123730432 bytes (1.1 GB) copied, 10.0675 s, 112 MB/s
1596492+0 records in
1596492+0 records out
1634807808 bytes (1.6 GB) copied, 15.0539 s, 109 MB/s
2076378+0 records in
2076378+0 records out
2126211072 bytes (2.1 GB) copied, 20.1374 s, 106 MB/s
2604458+0 records in
2604458+0 records out
2666964992 bytes (2.7 GB) copied, 25.0936 s, 106 MB/s
3249769+0 records in
3249769+0 records out
3327763456 bytes (3.3 GB) copied, 30.1172 s, 110 MB/s
3706217+0 records in
3706217+0 records out
3795166208 bytes (3.8 GB) copied, 35.1472 s, 108 MB/s
4161041+0 records in
4161041+0 records out
4260905984 bytes (4.3 GB) copied, 40.217 s, 106 MB/s
4658849+0 records in
4658849+0 records out
4770661376 bytes (4.8 GB) copied, 45.177 s, 106 MB/s
5172878+0 records in
5172878+0 records out
5297027072 bytes (5.3 GB) copied, 50.1933 s, 106 MB/s
5673673+0 records in
5673673+0 records out
5809841152 bytes (5.8 GB) copied, 55.2369 s, 105 MB/s
6162889+0 records in
6162889+0 records out
6310798336 bytes (6.3 GB) copied, 60.2468 s, 105 MB/s
6652265+0 records in
6652265+0 records out
6811919360 bytes (6.8 GB) copied, 65.2567 s, 104 MB/s
7199277+0 records in
7199277+0 records out
7372059648 bytes (7.4 GB) copied, 70.273 s, 105 MB/s
7709633+0 records in
7709633+0 records out
7894664192 bytes (7.9 GB) copied, 75.2966 s, 105 MB/s
8358561+0 records in
8358561+0 records out
8559166464 bytes (8.6 GB) copied, 80.3265 s, 107 MB/s
8783617+0 records in
8783617+0 records out
8994423808 bytes (9.0 GB) copied, 85.3363 s, 105 MB/s
9257129+0 records in
9257129+0 records out
9479300096 bytes (9.5 GB) copied, 90.3662 s, 105 MB/s
9745625+0 records in
9745625+0 records out
9979520000 bytes (10 GB) copied, 95.3763 s, 105 MB/s
10000000+0 records in
10000000+0 records out
10240000000 bytes (10 GB) copied, 97.6384 s, 105 MB/s
write complete, syncing
reading from: /mnt/disk1/test2.dd
10000000+0 records in
10000000+0 records out
10240000000 bytes (10 GB) copied, 74.7452 s, 137 MB/s
removing: /mnt/disk1/test2.dd
removed `/mnt/disk1/test2.dd’

4 TB Hitachi Performance Test 3 – writeread10GB

root@Tower:/tmp# writeread10gb /mnt/disk1/test3.dd
writing 10240000000 bytes to: /mnt/disk1/test3.dd
573321+0 records in
573321+0 records out
587080704 bytes (587 MB) copied, 5.03667 s, 117 MB/s
1047068+0 records in
1047067+0 records out
1072196608 bytes (1.1 GB) copied, 10.0428 s, 107 MB/s
1548708+0 records in
1548708+0 records out
1585876992 bytes (1.6 GB) copied, 15.1865 s, 104 MB/s
2097887+0 records in
2097887+0 records out
2148236288 bytes (2.1 GB) copied, 20.0827 s, 107 MB/s
2616418+0 records in
2616418+0 records out
2679212032 bytes (2.7 GB) copied, 25.1026 s, 107 MB/s
3222125+0 records in
3222125+0 records out
3299456000 bytes (3.3 GB) copied, 30.1227 s, 110 MB/s
3622181+0 records in
3622181+0 records out
3709113344 bytes (3.7 GB) copied, 35.1423 s, 106 MB/s
4122805+0 records in
4122805+0 records out
4221752320 bytes (4.2 GB) copied, 40.1651 s, 105 MB/s
4609597+0 records in
4609597+0 records out
4720227328 bytes (4.7 GB) copied, 45.1922 s, 104 MB/s
5244761+0 records in
5244761+0 records out
5370635264 bytes (5.4 GB) copied, 50.2359 s, 107 MB/s
5649025+0 records in
5649025+0 records out
5784601600 bytes (5.8 GB) copied, 55.2359 s, 105 MB/s
6108494+0 records in
6108494+0 records out
6255097856 bytes (6.3 GB) copied, 60.2551 s, 104 MB/s
6708433+0 records in
6708433+0 records out
6869435392 bytes (6.9 GB) copied, 65.3357 s, 105 MB/s
7138609+0 records in
7138609+0 records out
7309935616 bytes (7.3 GB) copied, 70.3055 s, 104 MB/s
7609825+0 records in
7609825+0 records out
7792460800 bytes (7.8 GB) copied, 75.3754 s, 103 MB/s
8129809+0 records in
8129809+0 records out
8324924416 bytes (8.3 GB) copied, 80.382 s, 104 MB/s
8504033+0 records in
8504033+0 records out
8708129792 bytes (8.7 GB) copied, 85.4354 s, 102 MB/s
9088689+0 records in
9088689+0 records out
9306817536 bytes (9.3 GB) copied, 90.3852 s, 103 MB/s
9532855+0 records in
9532855+0 records out
9761643520 bytes (9.8 GB) copied, 95.4016 s, 102 MB/s
10000000+0 records in
10000000+0 records out
10240000000 bytes (10 GB) copied, 100.055 s, 102 MB/s
write complete, syncing
reading from: /mnt/disk1/test3.dd
10000000+0 records in
10000000+0 records out
10240000000 bytes (10 GB) copied, 74.6704 s, 137 MB/s
removing: /mnt/disk1/test3.dd
removed `/mnt/disk1/test3.dd’

RAW Performance Results

Maximum Write Speed: 139 MB/s
Minimum Write Speed:  102 MB/s
Average Write Speed: 110 MB/s
Read Speed: 137 MB/s

These speeds are fairly on par with other green drives on the market, but of course slower than you would expect to see in a 7200 RPM drive or SSD. To provide a point of comparison, here are the results from an OCZ Agility 3 SSD:

Maximum Write Speed: 232 MB/s
Minimum Write Speed:  228 MB/s
Average Write Speed: 230 MB/s
Read Speed: 192 MB/s

The SSD is much faster, as we would expect. Keep in mind that these are not real-world numbers, but represent the threshold of expected performance from the hard drive or SSD in question. Also keep in mind that since we had only one 4 TB drive, the above tests were run on the drive without a parity drive assigned. If we had two of these drives in the system, we may have seen different results.

unRAID Performance

To ensure that unRAID’s performance was not hindered by the 4 TB Hitachi drive, we ran a quick transfer test using the hardware in Test 4 above. We transferred about 30 GB of test data from another unRAID test server as well as from a 500 GB 7200 RPM data drive in a desktop computer running Windows 7 directly to an unRAID disk share. Since we had only one 4 TB drive, we had no choice but run the 4 TB test array without a parity drive installed. Therefore, the transfer rates shown here are not representative of a standard unRAID array with a parity drive installed, but are likely to be much faster than normal.

4 TB Test Array (no parity)

Source Drive: unRAID user share on test server comprised of Green drives from WD, Hitachi, and Seagate.
Destination Drive: 4 TB Hitachi disk share
Destination Drive Connected To: Motherboard SATA Ports
Average Transfer Rate: 29 Mb/s

Source Drive: unRAID user share on test server comprised of Green drives from WD, Hitachi, and Seagate.
Destination Drive: 4 TB Hitachi disk share
Destination Drive Connected To: SIL3132
Average Transfer Rate: 29 Mb/s

Source Drive: unRAID user share on test server comprised of Green drives from WD, Hitachi, and Seagate.
Destination Drive: 4 TB Hitachi disk share
Destination Drive Connected To: SASLP
Average Transfer Rate: 29 Mb/s

Source Drive: unRAID user share on test server comprised of OCZ and Kingston SSDs.
Destination Drive: 4 TB Hitachi disk share
Destination Drive Connected To: Motherboard SATA Ports
Average Transfer Rate: 29 Mb/s

Source Drive: unRAID user share on test server comprised of OCZ and Kingston SSDs.
Destination Drive: 4 TB Hitachi disk share
Destination Drive Connected To: SIL3132
Average Transfer Rate: 29 Mb/s

Source Drive: unRAID user share on test server comprised of OCZ and Kingston SSDs.
Destination Drive: 4 TB Hitachi disk share
Destination Drive Connected To: SASLP
Average Transfer Rate: 29 Mb/s

Source Drive: Windows 7 desktop Seagate 500 GB 7200 RPM hard drive.
Destination Drive: 4 TB Hitachi disk share
Destination Drive Connected To: Motherboard SATA Ports
Average Transfer Rate: 62 Mb/s

Source Drive: Windows 7 desktop Seagate 500 GB 7200 RPM hard drive.
Destination Drive: 4 TB Hitachi disk share
Destination Drive Connected To: SIL3132
Average Transfer Rate: 62 Mb/s

Source Drive: Windows 7 desktop Seagate 500 GB 7200 RPM hard drive.
Destination Drive: 4 TB Hitachi disk share
Destination Drive Connected To: SASLP
Average Transfer Rate: 62 Mb/s

The test server has both hard drives and SSDs installed. The transfer rate from either was identical, indicating that the test server’s NIC was likely to be the bottleneck. The Windows 7 desktop computer uses an older Seagate 500 GB 7200 RPM as a data drive. The 62 Mb/s transfer rate observed in these tests was likely to be the limit of the source drive’s read speed slightly hindered by the NIC as well. As the observed transfer rates are typical of an unRAID array, we did not investigate the matter further. It is safe to say that you can expect to see normal transfer speeds on par with other green drives if you choose to use this 4 TB Hitachi drive in your unRAID array.

Conclusion

The Hitachi 4TB hard drive proved itself in all of our tests to be a reliable hard drive with performance on par with other green drives on the market today. unRAID 5.0-beta-14 displayed no aberrant behavior, indicating that it is fully compatible with 4 TB drives across a wide swath of popular hardware. We recommend the Hitachi 4 TB hard drive to any unRAID 5.0-beta-14 users wishing to push their drive capacity to the limits. This massive hard drive expands unRAID’s maximum capacity to an astonishing 80 TB of parity-protected storage! Yet again, home server enthusiasts are left with little other choice as to operating systems: unRAID remains the best!

(New) Norco SS-500 5-in-3 Drive Cage Review

You may recall my first review comparing three of the industry-leading drive cages (read it here!) in which I deemed the Norco SS-500 my pick of the litter. Well, that version of the Norco SS-500, which I will refer to as Version 1 (V1) (although the manufacturer makes no distinction) has been replaced with what I will refer to as the Norco SS-500 Version 2 (V2). The skinny: V1 does some things better, but V2 offers some improvements as well. In short, I’m still happy with V2 and would still choose it over the other options on the market today.

First, let’s enjoy some fabulous photos taken by Sarah, my friend and neighbor at Sarabek Images.

My original review didn’t contain many photos of the Norco SS-500 V1, but luckily unRAID user Whaler_99 included plenty of shots in his comprehensive drive cage review. If you need to jog your memory, check out his photos here. Thanks Whaler_99!

If you are familiar with the Norco SS-500 V1, you’ll notice quite a few changes to the V2 design. Most notable are:

  • New drive tray design. The drive trays now feature a grid of half-inch diameter holes underneath each drive to allow better airflow past the underside of the drive. As far as I can tell, the drive trays are the same dimensions as the old ones, so they should be interchangeable. However, I don’t have any V1 cages laying around, so I can’t confirm that.
  • New interior design. The metal plates separating each drive bay are now perforated with the same half-inch holes. With the exception of the column of holes closest to the front of the unit, the holes in the metal plates line up with the holes in the drive trays, allowing air to pass between the drive bays. The front-most column of holes are blocked by the solid metal and plastic part of the drive tray when it is fully inserted. Was this a design oversight?
  • New plastic molding on the rear of the unit. As before, the unit features five (5) SAS/SATA ports and two 4-pin redundant Molex connectors for drive and fan power. However, the fan now sticks out past the data and power connectors, much like the design of the iStarUSA BP-350.
  • New colors. The tabs on the drive tray handles are now a royal blue color (which is actually just a sticker on top of black plastic that could presumably be removed) instead of the old lavender color, and the drive tray’s sliding rails are now burgundy in color instead of the old blueish/purplish color (well, what would you call it?). The backplane is also now yellow instead of green, akin to the recent backplane change in the Norco rackmount cases.
  • New LEDs. The drive tray’s activity and power LEDs are now oval-shaped. Power is blue, and drive activity is green. The colors and style match those found on the newer Norco rackmount cases.

What may not be so obvious:

  • SATA III support. The yellow backplane now supports SATA III (6.0 Gb/s) drives as well as SATA II and SATA I drives. In practice this won’t make much of a difference with today’s hard drives since only SSDs are fast enough to make use of the extra bandwidth. If you are planning to install an SSD in this unit, see my notes on 2.5″ drive compatibility below.
  • New SATA port layout. The new layout of the SATA data ports are compatible with locking SATA cables! Locking SATA cables can help prevent intermittent problems as the normal vibration of the cage caused by the hard drives’ rotation slowly vibrates the connection loose over time. The V2′s SATA ports are now spaced with enough width that locking SATA cables can be used on all five ports. However, there is not enough space to unlatch a cable from the middle of the group. To unplug any locking SATA cable, you may have to unplug all of them.  The unit is still incompatible with right angle SATA cables, only the standard straight style will work.
  • Shorter depth. The V2 is slightly shorter in depth than the V1. The V1 had dimensions of 5″ x 5.75″ x just over 8.75″ (H x W x D) (thanks again to Whaler_99 for providing these dimensions!). The V2 has dimensions of 5″ x 5.75″ x 8.5″ (H x W x D), as shown below. The V2 is about a quarter inch shorter in depth than the V1. While this doesn’t seem like much, a quarter inch can be a big help when packing a drive cage into a small case. Furthermore, the cables now connect at an even shallower depth, leaving more room for the cable’s connectors and simplifying cable management. The depth of the plane of the cable connections is just under 7.5″. Note: Newegg lists the dimensions of the unit as 8.5″ x 5.75″ x 5″ (L x W x H), but if you look at the orientation of the unit in their photos, it seems that they are transposing the width and the height compared to my measurements. My guess is that the Newegg product photographer doesn’t necessarily know how the unit would actually be installed in a drive cage, because they are showing it on its side…

What hasn’t changed:

  • The drive tray’s handle is pretty much the same, besides the color modification.
  • The four silver rivets on the facade of the unit. As before, I would prefer a clean black plastic facade, but ultimately this is very minor nit-pick.
  • The redundant 4-pin Molex power connectors. It would have been nice to see the option to use SATA power connectors as well.
  • The somewhat-loud stock fan. I was hoping for an improvement here as well, but no dice.

Other notes:

  • V2 is slightly lighter in weight than the V1 due to the introduction of the plastic molding. The box claims 5.5 lbs, but I’m 99% sure they are recycling the boxes from the V1 units as the box also claims SATA I/II support, when I know the new unit actually supports SATA III as well. My Ikea scale of dubious accuracy reports roughly 5 lbs for the V2 unit (with no drives installed), which sounds about right (Newegg also lists 5 lbs). It may not be much, but when using 3 or 4 of these units in a 15 or 20 drive server, that’s a savings of 1.5 or 2 lbs, not too shabby. Those servers can get pretty heavy, so any weight saved is a good thing.
  • I’ve run all of my tests by plugging in both power connectors, but only one is necessary. When building a server with a single power supply, I would connect only one and only connect the second if I had problems with the first.
  • The drive trays should be compatible with 2.5″ drives (note the three screw holes in the bottom of the drive tray), but I had no luck.  I wasn’t able to successfully install a 2.5″ drive into the tray because the screws included with unit are slightly too large for the 2.5″ drive’s screw holes. I don’t remember having this problem with the V1 unit, but I also didn’t have the need to install 2.5″ drives with any regularity. If you are planning to install a 2.5″ drive into these new drive trays, be prepared to source your own screws (the ones that come with the drive may work if they have flat heads that won’t stick out past the bottom of the drive tray).

Airflow & Heat Tests
In my mind, the most significant changes to the Norco SS-500 pertain to the unit’s airflow. The V1 drive trays had a fantastic feature that allowed you to close a metal shutter to cut off airflow to any empty drive bay. This forced all incoming cool air drawn in by the unit’s fan to flow through the bays actually populated with drives, and not through what otherwise would be the path of least resistance through the empty bays. In my opinion, this was the feature that really set the Norco SS-500 V1 apart from the competition, as no other 5-in-3 drive cage offered this feature (to be fair, the Supermicro units have clunky plastic dummy drives that can help block airflow, but that solution isn’t nearly as elegant).

To my dismay, the Norco SS-500 V2 drive trays do not have the option of shutting off airflow through empty bays. Quite the opposite, the introduction of the half-inch diameter holes perforating the interior of the unit allows air to flow freely between drive bays! This could have one of two effects: 1) hot and cool air can flow unimpeded between the drive bays, allowing for more uniform heat distribution across the unit (this is good), or 2) cool air can follow the path of least resistance through any empty drive bays and not effectively cool the hot drives (this is bad). I decided to run some heat tests to see if I could discern whether this new design helps or hinders the effective cooling of hot-running drives.

I choose a collection of my hottest-running test drives – three Maxtor and two Seagate 7200 RPM 500 GB drives. As these are older drives, they run hotter and more power-hungry than modern 7200 RPM and 5400-5900 RPM (Green) drives. I was used to seeing these drives run in excess of 45C in an environment without adequate cooling. I ran these hot drives through a series of passes of preclear and observed the drive temperatures as recorded in preclear’s output report. Drive bays are numbered from the left when looking at the front of the unit. Tests 1 and 2 are designed to test the unit’s ability to effectively cool drives when partially full (leaving the majority of the bays empty). Test 3 assesses the unit’s ability to effectively cool drive when completely full (no empty bays). Test 4 is a repeat of Test 3, but over a longer duration.

Test Conditions
unRAID version 5.0-beta14 or unRAID version 4.7
Preclear version 1.13
Ambient Room Temperature: 20.5 C (69 F)

Normal Preclear Cycle refers to a standard preclear cycle, which includes the pre-read, write, and post-read phases.
Fast Preclear Cycle refers to the use of the -n flag, which skips the pre-read and runs only the write and post-read phases. The write phase should produce the highest level of heat production from any hard drive, so I believe a fast preclear is an appropriate tool for a heat test.

Results

TEST 1
Drive Bay Hard Drive Model & Serial Preclear Cycles Elapsed Time (HH:MM:SS) Starting Temp Final Temp
1 Maxtor 6H500F0 H80BYRZH 1 Fast 02:32:55 23 C 34 C
2 Maxtor 6H500F0 H80C0QFH 1 Fast 02:36:57 23 C 33 C
TEST 2
Drive Bay Hard Drive Model & Serial Preclear Cycles Elapsed Time (HH:MM:SS) Starting Temp Final Temp
4 Maxtor 6H500F0 H80BYRZH 1 Fast 02:30:15 32 C 35 C
5 Maxtor 6H500F0 H80C0QFH 1 Fast 02:35:03 31 C 33 C
TEST 3
Drive Bay Hard Drive Model & Serial Preclear Cycles Elapsed Time (HH:MM:SS) Starting Temp Final Temp
1 Maxtor 6H500F0 H80BYRZH 1 Fast 02:35:51 29 C 34 C
2 Maxtor 6H500F0 H80C0QFH 1 Fast 02:40:32 29 C 35 C
3 Maxtor 6A500FO 5QG04QSP 1 Fast 02:22:48 21 C 33 C
4 Seagate ST3500630AS 5QG0AD03 1 Fast 02:27:59 22 C 33 C
5 Seagate ST3500630AS 9QG19EFN 1 Fast 02:13:11 23 C 32 C
TEST 4
Drive Bay Hard Drive Model & Serial Preclear Cycles Elapsed Time (HH:MM:SS) Starting Temp Final Temp
1 Maxtor 6A500F0 5QG04QSP 1 Normal 09:24:00 38 C 34 C
2 Maxtor 6H500F0 H80BYRZH 1 Normal 10:05:58 40 C 35 C
3 Seagate ST3500630AS 9QG19EFN 1 Normal 09:15:21 39 C 35 C
4 Maxtor 6H500F0 H80C0QFH 1 Normal 10:21:59 38 C 33 C
5 Maxtor STM3320620AS 5QF3QPRY 1 Normal 05:53:02 28 C 32 C

Note1: Test 2 was run immediately after the end of Test 1, which accounts for the high starting temperature. Test 4 was also started with hot drives immediately following an unrelated test. All other tests were run after letting the drives sit powered off for many hours, so they started at room temperature.
Note2: The Seagate drive ending in AD03 apparently failed between Test 3 and Test 4. While I doubt this failure had anything to do with the Norco SS-500 V2, I can’t rule it out either. It was an old drive and I believe it died of natural causes.  In Test 4 I replaced it with my next largest 7200 RPM drive, which is a Maxtor 320 GB ending in QPRY (hence the much shorter preclear cycle elapsed time).
Note3:I purposefully mixed up which drives went into which drive bays when transitioning between Test 3 and Test 4 as I wanted to see if the drives that ran the hottest in Test 3 would also run the hottest in Test 4. It appears that there is no correlation.

Average Change in Temperature: +3.93 C
Max Final Temperature: 35 C
Max Variance of Final Temperature: 3 C

I am very pleased with these test results. They show several positive outcomes: 1) the Norco SS-500 V2′s stock fan and new airflow design are well suited for cooling five hot-running 7200 RPM hard drives in a standard room temperature environment (Test 4 even shows the drives as cooler by the end of the test than at the beginning!), 2) the new airflow design (specifically the perforated holes in the drive trays and bay dividers) allow for even distribution of heat between all drive bays, which results in a very low temperature variance between bays. Put another way, there are no pockets of hot air collecting in any region of the drive cage, but instead all hot air is effectively vented out of the rear of the unit even when it is only partially full. After running these tests, I’m confident that the stock fan is capable of handling hot drives in any arrangement even without the option of preventing airflow through empty bays. If noise is not a concern for you, then there’s no need to replace the stock fans in these units. If noise is a concern, then that leads us to the topic of….

Fan Replacement
The stock fans in the Norco SS-500 V1 seemed to have a bit of variance in terms of noise levels – I found some to be acceptable, and some to be unacceptable. Sensitivity to fan noise is a very subjective and circumstantial matter, so even the fans that I considered to be acceptable for a home office still may be too loud for a home theater room. Also, just like any other hardware, fans can wear out and fail over time. Therefore, the ease with which one can replace the fan in a drive cage is an important consideration.

I’ll be frank – fan replacement in the Norco SS-500 V2 is not easy. In V1, a few simple screws would free the fan from its binds, and replacing the fan was just as easy. Granted, replacing the fan in a V1 that was installed in a chassis was no picnic, but replacing the fan of a unit prior to installation was no big deal. V2 has taken a significant step backwards. It is not only more difficult to replace the fan of a unit installed in a chassis, but it is also quite the pain to replace a fan prior to installation as well! The black plastic molding on the rear of the unit comes off with the removal of four screws, like so:

Unplug the fan’s 4-pin power connector and the two parts will separate. The fan is likewise connected with four small and non-standard screws (definitely not the typical self-threading fan screws that I’m used to). Removing the screws is not enough to free the fan, it is held in place by friction from four thin plastic posts, as seen below:

These posts are the fatal flaw of the fan housing. The fan sits in the housing at such a depth that it is impossible to simply lift the fan off the posts. The only way that I’ve figured out to remove the fan is to flip the fan housing over and very gingerly press it downwards on the center of the fan with a small screwdriver. I had to press in a star pattern (much like tightening the lug-nuts on a car tire) in order to force the fan off the posts without breaking one, as each press with the screwdriver would bend all the posts ever-so-slightly. I should say, that’s the technique I figured out the second time I attempted to remove a fan from one of these units. The first time I broke it:

Oops

I pulled the fan from the interior side (the side without the sticker) and snapped off the lower two plastic posts. So, my warning to you: if you plan to replace the fan in the Norco SS-500 V2, BE CAREFUL not to break the four posts that secure the fan in place. If you were to break them, like I did, a bit of double-sided tape might be a quick and easy solution to allow you to mount your replacement fan without screws. Or you can take my route, which was to email Norcotek support, explain the situation, and ask for a replacement fan guard. To their credit, Norcotek shipped me a replacement fan housing the following day, which is the best customer service I’ve seen from that company to date. Granted, I mentioned that I broke the fan housing in the process of evaluating the unit for a review for this blog, so perhaps that helped speed along their response. ;)

For anyone curious, this is the Norco SS-500 V2′s stock fan:

The sticker reads: KENON Motors, DC Brushless, Model KMF08DHHD1B. The Kenon Motors website is down, so I haven’t been able to find any further information about this fan, such as the dB and CFM ratings (if you are able to track them down, please leave them in a comment below!). The stock fan is a 4-pin model, however the backplane provides only 3 pins to power the fan. The good news regarding fan replacement is that any standard 3-pin or 4-pin 80 mm fan will work. By ‘standard,’ I am referring to the symmetrical frame that allows you to mount a fan either direction, as shown in the photo above. For an example of a non-standard frame, see the Arctic Cooling ACF8 Pro. Note how the Arctic Cooling fan has screw holes on only one side? This (and most other non-standard fans) are NOT compatible with the Norco SS-500 V2′s mounting system. While I don’t have any on hand to physically test them, I would tentatively recommend the Coolink SWiF2-801 as an appropriate replacement fan for the Norco SS-500 V2. My reasons are twofold: I know this particular fan to be quiet and yet powerful enough to cool five hot drives (it is the same model I used to use in the Norco SS-500 V1), and it does use the standard symmetrical fan frame design. As soon as I do have a chance to actually test this fan in the V2, I will amend this post with my results.

Another point of interest regarding the fan: according to the box and the Manufacturer’s Website the Norco SS-500 V2 has two jumper options for altering the function of the fan. One is supposed to force the fan to run at half-speed, the other is supposed to disable the fan fail alarm (indicating that the alarm should be enabled by default). The V2′s backplane actually has five individual jumpers, none of which seem to do anything. I’ve powered on the unit with no fan attached and no alarm sounds. In fact, I can’t find a speaker on either side of the backplane. At this point, I don’t believe the V2 has any fan fail alarm or fan speed control. Installing your own fan speed controller would also be tricky – you would probably have to cut your own cable-routing hole through the plastic molding.

Final Thoughts
At the end of the day, I do miss the V1′s feature of being able to shut off airflow to individual drive bays. However, my heat tests show even without this feature, the V2 is capable of properly venting hot air even in a partially-full configuration. Therefore, the airflow shutters aren’t necessary. In fact, since I’ve read reports of users forgetting to open the shutters when installing new drives, perhaps it is a good thing that this is no longer a variable. My other primary gripe is the difficulty of replacing the fan. If you are looking for a drive cage that will let you replace the fan without dismantling your server, then the SUPERMICRO CSE-M35T-1B that I reviewed earlier is the only option, but it has other drawbacks as well. I still consider the Norco SS-500 V2′s drive tray design to the best of the bunch, and considering that the average user will spend most of their time dealing with the drive tray and not with the rest of the unit, I believe that this benefit outweighs the few other downsides of the unit. I will recommend the Norco SS-500 V2 in the Greenleaf Prototype Builds and they will be the standard drive cage used in the Greenleaf Cleverbox 15 and Cleverbox 20 Tower Servers.

I believe I’ve covered all the bases, but if you feel I’ve overlooked something or if there are any further tests you would like me to run, don’t hesitate to leave a comment below!  Thanks for reading!

15 Drive Budget Board Testing – Introduction of the Beta Boards?

My latest round of 15 Drive Budget Board testing has been dragging on for months now! I’ve identified several motherboards incompatible with unRAID 4.7. In general, the NIC is the issue. For example, the Realtek 8111E NIC is widely known within the unRAID community to be incompatible in 4.7, yet nearly every motherboard manufacturer on the market is creating inexpensive motherboards that use this NIC. An incompatible NIC is easily replaced with a PCI or PCIe NIC (preferably Intel), but when you have to drop an extra $30 on a NIC, then it sort of defeats the purpose of a budget board, doesn’t it? Anyway, here’s the list I compiled many delicious moons ago of potential 15 Drive budget boards:

Boards to be considered: Price Notes
Foxconn A88GMV $59.99 5 SATA + 1 eSATA
MSI 760GM-P33 $49.99 Atheros AR8131M NIC (reported incompatible)
ASRock A785GM-LE $58.99 Realtek 8111DL NIC, takes DDR2 RAM
MSI 760GM-P35 $59.99 Atheros AR8131M NIC (reported incompatible)
Foxconn A74ML-K $49.99 Realtek 8111D NIC, 4 SATA, requires PCI card
GIGABYTE GA-M68MT-S2 $54.99 Realtek 8211CL NIC, 4 SATA
ASRock 880GM-LE $54.99 2 Defective in a row!
Foxconn G41MXE $44.99 LGA 775, 4 SATA

Most of those prices are likely to be obsolete by this point, and I’m sure some of the boards are discontinued as well. You can see from my notes that the NIC was my primary concern with each board. I originally tested the ASRock 880GM-LE as it had the best specs on paper, but unfortunately I received two defective boards in a row and had to RMA them. Two is my limit when it comes to defective hardware, so I returned the board for a refund and keep working through the list.

My next two choices were the Foxconn A88GMV and the MSI 760GM-P33. The Foxconn is still available today for $55, and the MSI board has been discontinued at Newegg, but is currently available on eBay.

Foxconn A88GMV
This motherboard is well laid-out and offers lots of features considering the low price. VGA, DVI, and HDMI ports give you plenty of options for connecting a monitor for system maintenance, and the 6 rear-side USB 2.0 ports are more than enough. The AM3 socket works perfectly with the popular AMD Sempron 145 CPU, and 4 DDR3 DIMMS allow for up to 16 GB of RAM (the most I personally tested was 8 GB). A PCIe x16 slot, PCIe x1 slot, and two legacy PCI slots offer plenty of expansion opportunities, easily up to the 15 drive mark. The tech specs decry 5 SATA II ports and one eSATA port, but this is really just a bit of marketing fluff. There are 5 blue SATA ports and 1 white SATA port, all of which behave in exactly the same way. Calling the white SATA port an eSATA port is bordering on false advertising, since the motherboard has no rear eSATA port, nor does it come with a SATA to eSATA adapter. If your chassis has an eSATA port then you can hook it up to any of the SATA ports, not just the white one. I personally consider the board to just have 6 SATA ports and no eSATA ports.

Again, the biggest question with this board was the NIC. Both Newegg and Foxconn are decidedly vague about the actual make and model of the NIC, but based on the network driver available to download from the Foxconn site I determined the NIC to be a Realtek NIC, and chances are good that it is the Realtek 8111E.

I paired the board with an AMD Sempron 145 CPU and 8 GB (2 x 4GB) of G.Skill DDR3-1333 RAM. The motherboard passed nearly all tests with unRAID 4.7, including compatibility with the most common SATA Controllers, the Supermicro AOC-SASLP-MV8 and the Monoprice 2 Port PCIe x1. However, as expected, the board failed the NIC test. When transferring large quantities of data across the network, the connection would drop out, and sometimes CRC checks would flag corrupted data as well. The NIC did work, but it was unreliable. I therefore DO NOT RECOMMEND this board for use with unRAID 4.7.

MSI 760GM-P33
This motherboard also has a decent feature set, with an AM3 CPU socket, two DDR3 RAM slots (max of 8 GB), a PCIe x16 slot, two PCIe x1 slots, and a PCI slot as well. The back panel options are definitely more limited, with only VGA for video and 4 USB 2.0 ports. The motherboard features 6 SATA II ports, two of which face upwards and four face sideways. These sideways facing ports can be an issue when installing the motherboard into a small form factor chassis. The Atheros AR8131M NIC was definitely the biggest unknown, as Atheros NICs are notoriously flaky in an unRAID environment. Forum research turned up this thread in which unRAID user Alex.vision reported issues with the NIC that were solved by replacing it with a PCI NIC. I also turned up this thread in which unRAID user chrishorton7 reported the NIC working in unRAID 5.0-beta-12a.

I installed the same Sempron 145 and 8 GB of RAM and ran the board through my tests, including testing the same Supermicro and Monoprice SATA controllers. This motherboard had nearly identical results as the Foxconn board. All tests with unRAID 4.7 passed except for the NIC test. Again, the NIC would drop off during transfers and was generally unreliable. I also DO NOT RECOMMEND this board for use with unRAID 4.7.

Back to the drawing board…
At this point there are only three boards left on the list that are still readily available – the Foxconn G41MXE, the GIGABYTE GA-M68MT-S2, and the ASRock A785GM-LE. The Foxconn is an LGA 775 board, which is a somewhat obsolete CPU socket type that I would rather avoid in a budget board. The Gigabyte is likely to have HPA issues. The ASRock board looks good on paper, although it does take older and more expensive DDR2 RAM. There aren’t any clear-cut reports of the board working well with unRAID on the forums, but I did come across this thread in which unRAID user TheStapler reported some odd errors that may or may not be caused by the motherboard. If I were to purchase a new budget board to test today, it would be this ASRock board. However, I believe I’m going to hold off for a bit because LimeTech has announced their plans to release unRAID 5.0 stable by the end of February! With this new information, I decided to retest the hardware I had at hand with the latest unRAID 5.0 beta (currently 5.0-beta-14) to check for compatibility. The only question was the NIC, since all previous boards had passed every other test.


Testing for unRAID 5.0 beta compatibility
I took the Foxconn A88GMV and MSI 760GM-P33 board through the gamut again to test for compatibility with the latest unRAID 5.0 beta, which happens to be unRAID 5.0-beta-14. I did skip several of the tests that wouldn’t be affected by the changes to unRAID. I focused on the tests that would matter – the parity sync, parity check, and the all-important NIC test. I’m happy to report that both boards passed all three tests with no issues what-so-ever. I fully endorse both the Foxconn A88GMV and MSI 760GM-P33 as solid choices for a 15 Drive Budget Build based on unRAID 5.0-beta-14. Given the availability and extra features of the Foxconn board, I think it is the clear choice. However, if you come across the MSI board (or maybe grab it on eBay for $40 or less), then I wouldn’t hesitate to use it either.

Given unRAID 5.0 beta’s maturity and imminent stable release, I think it makes sense to turn the focus of my budget board testing towards the 5.0 betas and away from 4.7. I will certainly test any new hardware with both versions of unRAID, but I may begin to change my criteria of what makes qualifies a budget board in the first place.

By the way, I also tested both the Beta Boards for compatibility with a 4 TB drive. Both passed. More on that later. ;)

Quick addendum to this post: here’s another previous budget board I had laying around that failed the NIC test with unRAID 4.7 but fully passed all tests with unRAID 5.0-beta-14: The ECS 785GM-M7.  Pretty hard to find these days, so I doubt this board will help many people, but its the thought that counts, right?

JVC miniBox

If you live in the SF Bay Area and haven’t heard of Urban Ore, you need to check it out.  Something like a thrift store on steroids, the warehouse-sized bazaar vends wares ranging from cabinet doors, construction supplies and tools to early 90s electronics, retro furniture, and large-scale art from theater sets.  All for thrift store prices.  I think I’ll start sojourning there weekly, and hopefully find more gems like this:
JVC miniBox – $2.00

Inside I found a 65W PSU (4A on the +12V rail), a 1.06 GB Seagate SCSI Hard Drive (model #ST31055N), a SCSI CD-ROM drive, and about a pound of dust.


I stripped and cleaned the box with a quickness.  Happily, a miniITX motherboard fits quite nicely in the upper compartment (though there are no motherboard mounts):

Fitting a power supply in that small case will be much more of a challenge.  A PicoPSU might be the only option.  A stock CPU heatsink also probably won’t fit, so I may need to use a board with a low profile passive heatsink, such as a Supermicro Atom board.  The 80mm fan mount in the rear is likely enough to keep the whole box cool, but I may cut out more to accommodate a 120mm fan to improve cooling and reduce noise.  The dual 5.25″ bays will easily accommodate a 3-in-2 cage or two single hot swap cages (there are no tabs separating the bays).  Finally, a paint job is in order as no-one likes that ugly beige…why was that horrid color the standard for so many years?

So, what should I do with this one?  The obvious options in my mind are a 3 drive miniServer, an HTPC, or a SFF desktop computer.  What do you think?

New 20 Drive Budget Board!

This latest round of budget board testing has been quite a challenge.  Between moving, holidays, and other distractions, I’ve fallen so far behind in my testing timeline that several of the boards I’m testing are now discontinued!  I will complete the tests and post the results for posterity’s sake, but they may not be of much help to anyone.

In spite of this, I have identified one overarching success.  As part of my testing, I looked into 20 Drive Budget Boards as well as the standard 15 Drive Budget Boards. I’m happy to report a winner in the 20 Drive category: the ECS A885GM-A2 (V1.1).  At the time of this writing, the motherboard retails for $70 at Newegg, which I believe is a very reasonable price for a board with up to 20 Drive potential (and $10 less than I originally paid for it).

My criteria for a 20 Drive Budget Board is as follows:

  • Compatible with inexpensive CPUs (such as AMD Sempron and Intel Celeron)
  • Compatible with inexpensive RAM (typically DDR3 1066 or 1333)
  • Two or more PCIe x4 or faster slots
  • Onboard video
  • Onboard Gigabit LAN with unRAID-compatible NIC
  • Four or more onboard SATA ports
  • Priced under $100

While researching motherboards that fit these criteria I found that the options were mighty scare.  In fact, I found only a single motherboard on Newegg that met these criteria.  This motherboard has an AM3 CPU socket, 4 DIMMs, 4 PCIe slots (x16, x4, x1, x1), 2 PCI slots, 5 SATA III ports, onboard video with VGA & DVI ports, and a Realtek 8111DL NIC.  In short, everything I ever wished for.  At least the choice was easy…I ordered the ECS A885GM-A2 (V1.1) for $80

I installed a Sempron 145 CPU and 8 GB (2 x 4 GB) of Patriot RAM (more than I generally use in test systems, but I needed to burn it in anyway).  I hooked up the motherboard to a PSU on my test bench, then proceeded to run the board through all of the same tests detailed towards the end of this previous blog post.  The motherboard passed every test with full marks.  I’m happy to announce that the ECS A885GM-A2 (V1.1) is fully compatible with unRAID and that it is my new recommended 20 Drive Budget Board!

I will note one caveat for this board – four of the five SATA ports face sideways.  In some builds in smaller server cases, this can prove to be a problem as the cables may not fit.  However, any 20 drive build will necessitate a large server case (such as the Antec 1200 V3), which will have no problem accommodating the sideways SATA ports.  Just be aware of this if you plan to use this motherboard in a smaller case.